Configure a host path storage destination
This topic describes how to install Velero and configure a host path as your storage destination for backups.
If Velero is already installed, you can update your storage destination in the Replicated Admin Console.
For embedded clusters with the Velero add-on, you must update the default internal storage settings in the Admin Console because internal storage is insufficient for full backups.
For more information about updating storage, see Updating Settings in the Admin Console.
Replicated KOTS is available only for existing customers. For supporting installations into customer managed clusters, we recommend Helm. For more information, see About Helm Installations with Replicated.
KOTS is a Generally Available (GA) product for existing customers. For more information about the Replicated product lifecycle phases, see Support Lifecycle Policy.
The local-volume-provider (LVP) plugin supports only Restic. Velero 1.17 and later do not support LVP. KOTS uses LVP only when you disable MinIO or explicitly install the LVP plugin. If you use LVP for HostPath storage, migrate to a Kopia-compatible destination before upgrading to Velero 1.17 or later. Existing LVP backups from Velero 1.16 and earlier are not restorable on Velero 1.17 or later. For more information, see Upgrade Velero for snapshots.
Requirements
-
The host path must be a dedicated directory. Do not use a partition used by a service like Docker or Kubernetes for ephemeral storage.
-
The host path must exist and be writable by the user:group 1001:1001 on all nodes in the cluster. For example, in a Linux environment you might run
sudo chown -R 1001:1001 /backupsto change the user:group permissions.If you use a mounted directory for the storage destination, such as one that is created with the Common Internet File System (CIFS) or Server Message Block (SMB) protocols, ensure that you configure the user:group 1001:1001 permissions on all nodes in the cluster and from the server side as well.
You cannot change the permissions of a mounted network shared filesystem from the client side. To reassign the user:group to 1001:1001 for a directory that is already mounted, you must remount the directory. For example, for a CIFS mounted directory, specify the
uid=1001,gid=1001mount options in the CIFS mount command.
Prerequisites
Complete the following items before you perform this task:
- Review the limitations and considerations. See Limitations and Considerations in About Backup and Restore.
- Install the velero CLI. See Install the Velero CLI.
Install Velero and configure host path storage in online environments
To install Velero and configure host path storage in online environments:
-
Run one of the following commands to install Velero, depending on the version of the velero CLI you are using. In the command, replace
$AWS_PLUGIN_VERSIONwith the version of thevelero/velero-plugin-for-awsplugin that is compatible with your Velero version.The following table lists the
velero/velero-plugin-for-awsversions that are compatible with each supported Velero version. For the full Compatibility Matrix, see Compatibility in velero-plugin-for-aws.Velero version AWS plugin version v1.18.x v1.14.2 v1.17.x v1.13.x v1.16.x v1.12.x v1.15.x v1.11.x v1.14.x v1.10.x v1.13.x v1.9.x v1.12.x v1.8.x v1.11.x v1.7.x -
Velero v1.17 and later:
velero install \--no-default-backup-location \--no-secret \--use-node-agent \--use-volume-snapshots=false \--plugins velero/velero-plugin-for-aws:$AWS_PLUGIN_VERSION -
Velero v1.11 to v1.16:
velero install \--no-default-backup-location \--no-secret \--use-node-agent --uploader-type=restic \--use-volume-snapshots=false \--plugins velero/velero-plugin-for-aws:$AWS_PLUGIN_VERSION
-
-
Configure the node-agent DaemonSet specification if your cluster uses one of the following Kubernetes distributions:
- RancherOS
- OpenShift
- Microsoft Azure
- VMware Tanzu Kubernetes Grid Integrated Edition
For information about how to configure the node-agent DaemonSet for these distributions, see Configure node-agent DaemonSet spec in the Velero documentation.
-
Run the following command to configure the host path storage destination:
kubectl kots velero configure-hostpath --namespace NAME --hostpath /PATHReplace:
NAMEwith the namespace where the Replicated KOTS Admin Console is installed and runningPATHwith the path to the directory where the backups will be stored
For more information about required storage destination flags, see
veleroin Reference.
Install Velero and configure host path storage in air-gapped environments
To install Velero and configure host path storage in air-gapped environments:
-
Run
velero version --client-onlyto check the version of the velero CLI that you installed as part of Installing the Velero CLI. -
Run one of the following commands to install Velero, depending on the version of the velero CLI you are using. In the command, replace
$AWS_PLUGIN_VERSIONwith the version of thevelero/velero-plugin-for-awsplugin that is compatible with your Velero version.The following table lists the
velero/velero-plugin-for-awsversions that are compatible with each supported Velero version. For the full Compatibility Matrix, see Compatibility in velero-plugin-for-aws.Velero version AWS plugin version v1.18.x v1.14.2 v1.17.x v1.13.x v1.16.x v1.12.x v1.15.x v1.11.x v1.14.x v1.10.x v1.13.x v1.9.x v1.12.x v1.8.x v1.11.x v1.7.x -
Velero v1.17 and later:
velero install \--no-default-backup-location \--no-secret \--use-node-agent \--use-volume-snapshots=false \--plugins velero/velero-plugin-for-aws:$AWS_PLUGIN_VERSION -
Velero v1.11 to v1.16:
velero install \--no-default-backup-location \--no-secret \--use-node-agent --uploader-type=restic \--use-volume-snapshots=false \--plugins velero/velero-plugin-for-aws:$AWS_PLUGIN_VERSION
noteIt is typical for the velero and node-agent Pods to be in the
ErrImagePullorImagePullBackOffstate after you run thevelero installcommand because Velero does not support passing registry credentials during installation. In Replicated KOTS v1.94.0 and later, this situation resolves itself after you complete the instructions to configure the storage destination.If you are on an earlier version of KOTS, Replicated recommends that you upgrade to KOTS v1.94.0 or later. Otherwise, you must patch the Velero deployment manually and add the image pull secret to access the registry.
-
-
Configure the node-agent DaemonSet specification if your cluster uses one of the following Kubernetes distributions:
- RancherOS
- OpenShift
- Microsoft Azure
- VMware Tanzu Kubernetes Grid Integrated Edition
For information about how to configure the node-agent DaemonSet for these distributions, see Configure node-agent DaemonSet spec in the Velero documentation.
-
Run the following command to configure the host path storage destination:
kubectl kots velero configure-hostpath \--namespace NAME \--hostpath /PATH \--kotsadm-registry REGISTRY_HOSTNAME[/REGISTRY_NAMESPACE] \--registry-username REGISTRY_USERNAME \--registry-password REGISTRY_PASSWORDReplace:
NAMEwith the namespace where the Admin Console is installed and runningPATHwith the path to the directory where the backups will be storedREGISTRY_HOSTNAMEwith the registry endpoint where the images are hostedREGISTRY_NAMESPACEwith the registry namespace where the images are hosted (Optional)REGISTRY_USERNAMEwith the username to use to authenticate with the registryREGISTRY_PASSWORDwith the password to use to authenticate with the registry
For more information about required storage destination flags, see
veleroin Reference.
Configure host path storage in the Admin Console
Alternatively, when the Admin Console and application are already installed, you can start in the Admin Console to install Velero and configure a host path storage destination.
To install Velero and configure host path storage for existing clusters:
-
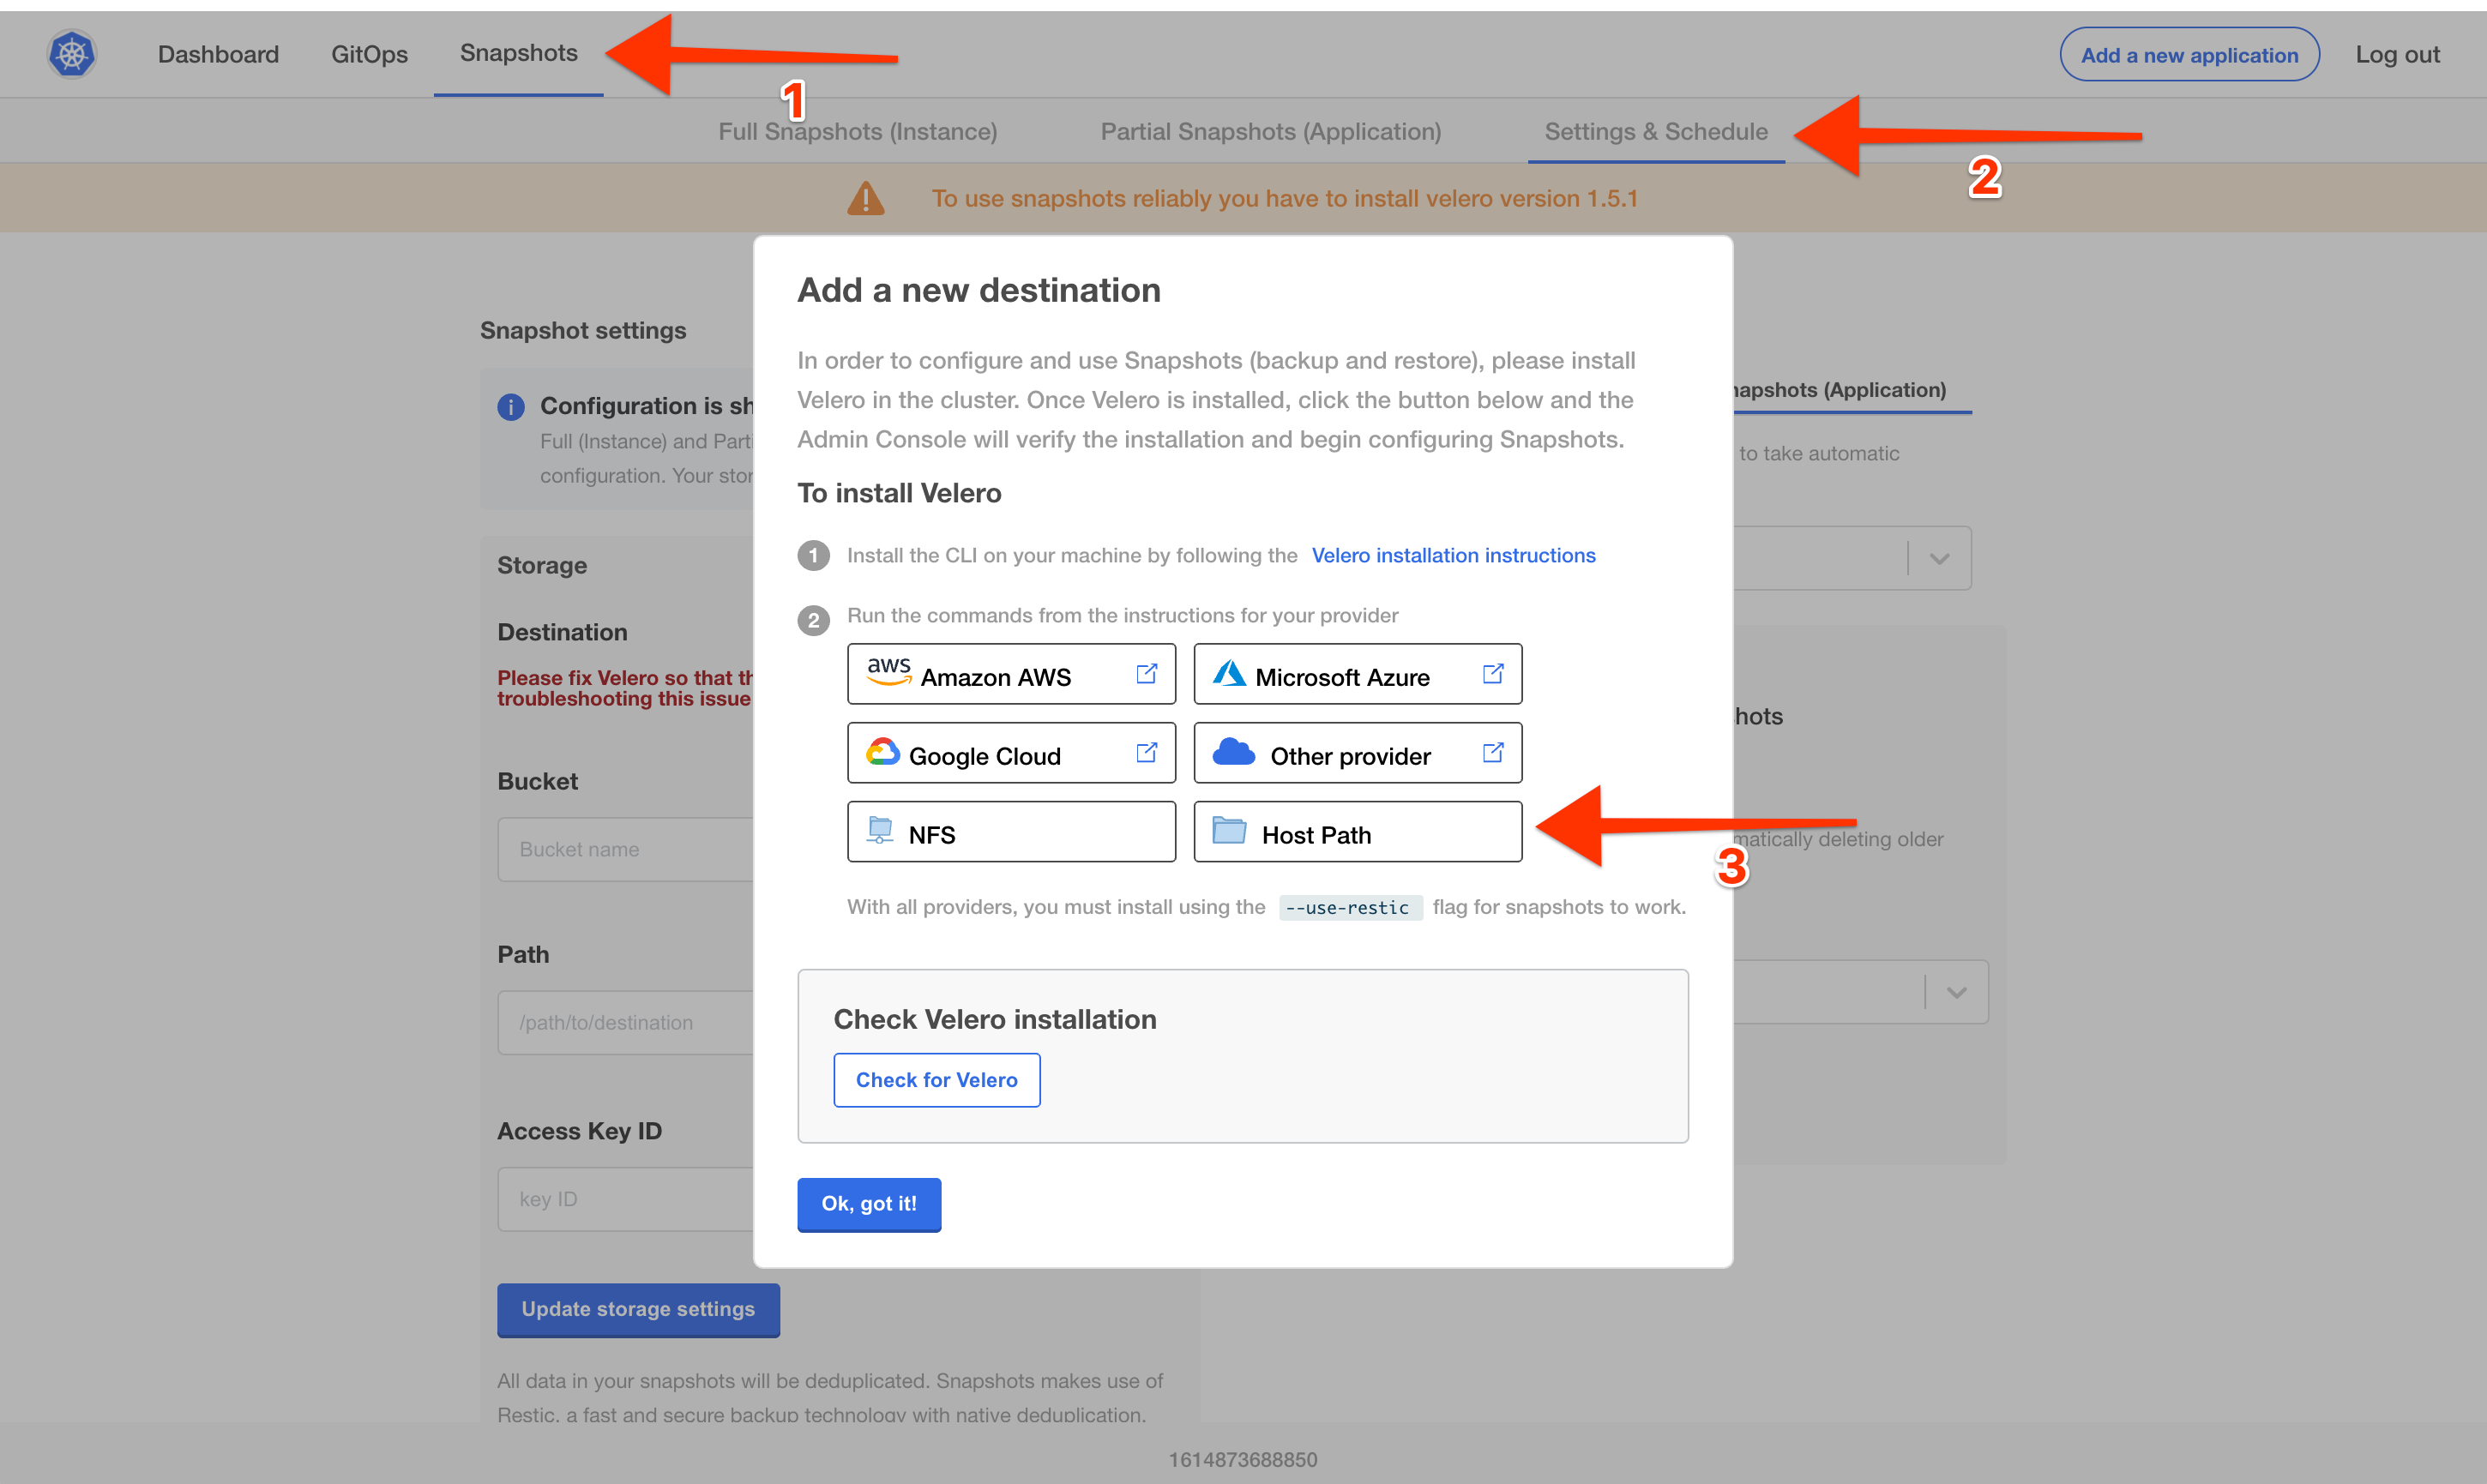
From the Admin Console, click Snapshots > Settings and Schedule.
-
Click Add a new storage destination.
The Add a new destination dialog opens and shows instructions for setting up Velero with different providers.
-
Click Host Path.
-
In the Configure Host Path dialog, enter the path to the directory where the backups will be stored. Click Get instructions.
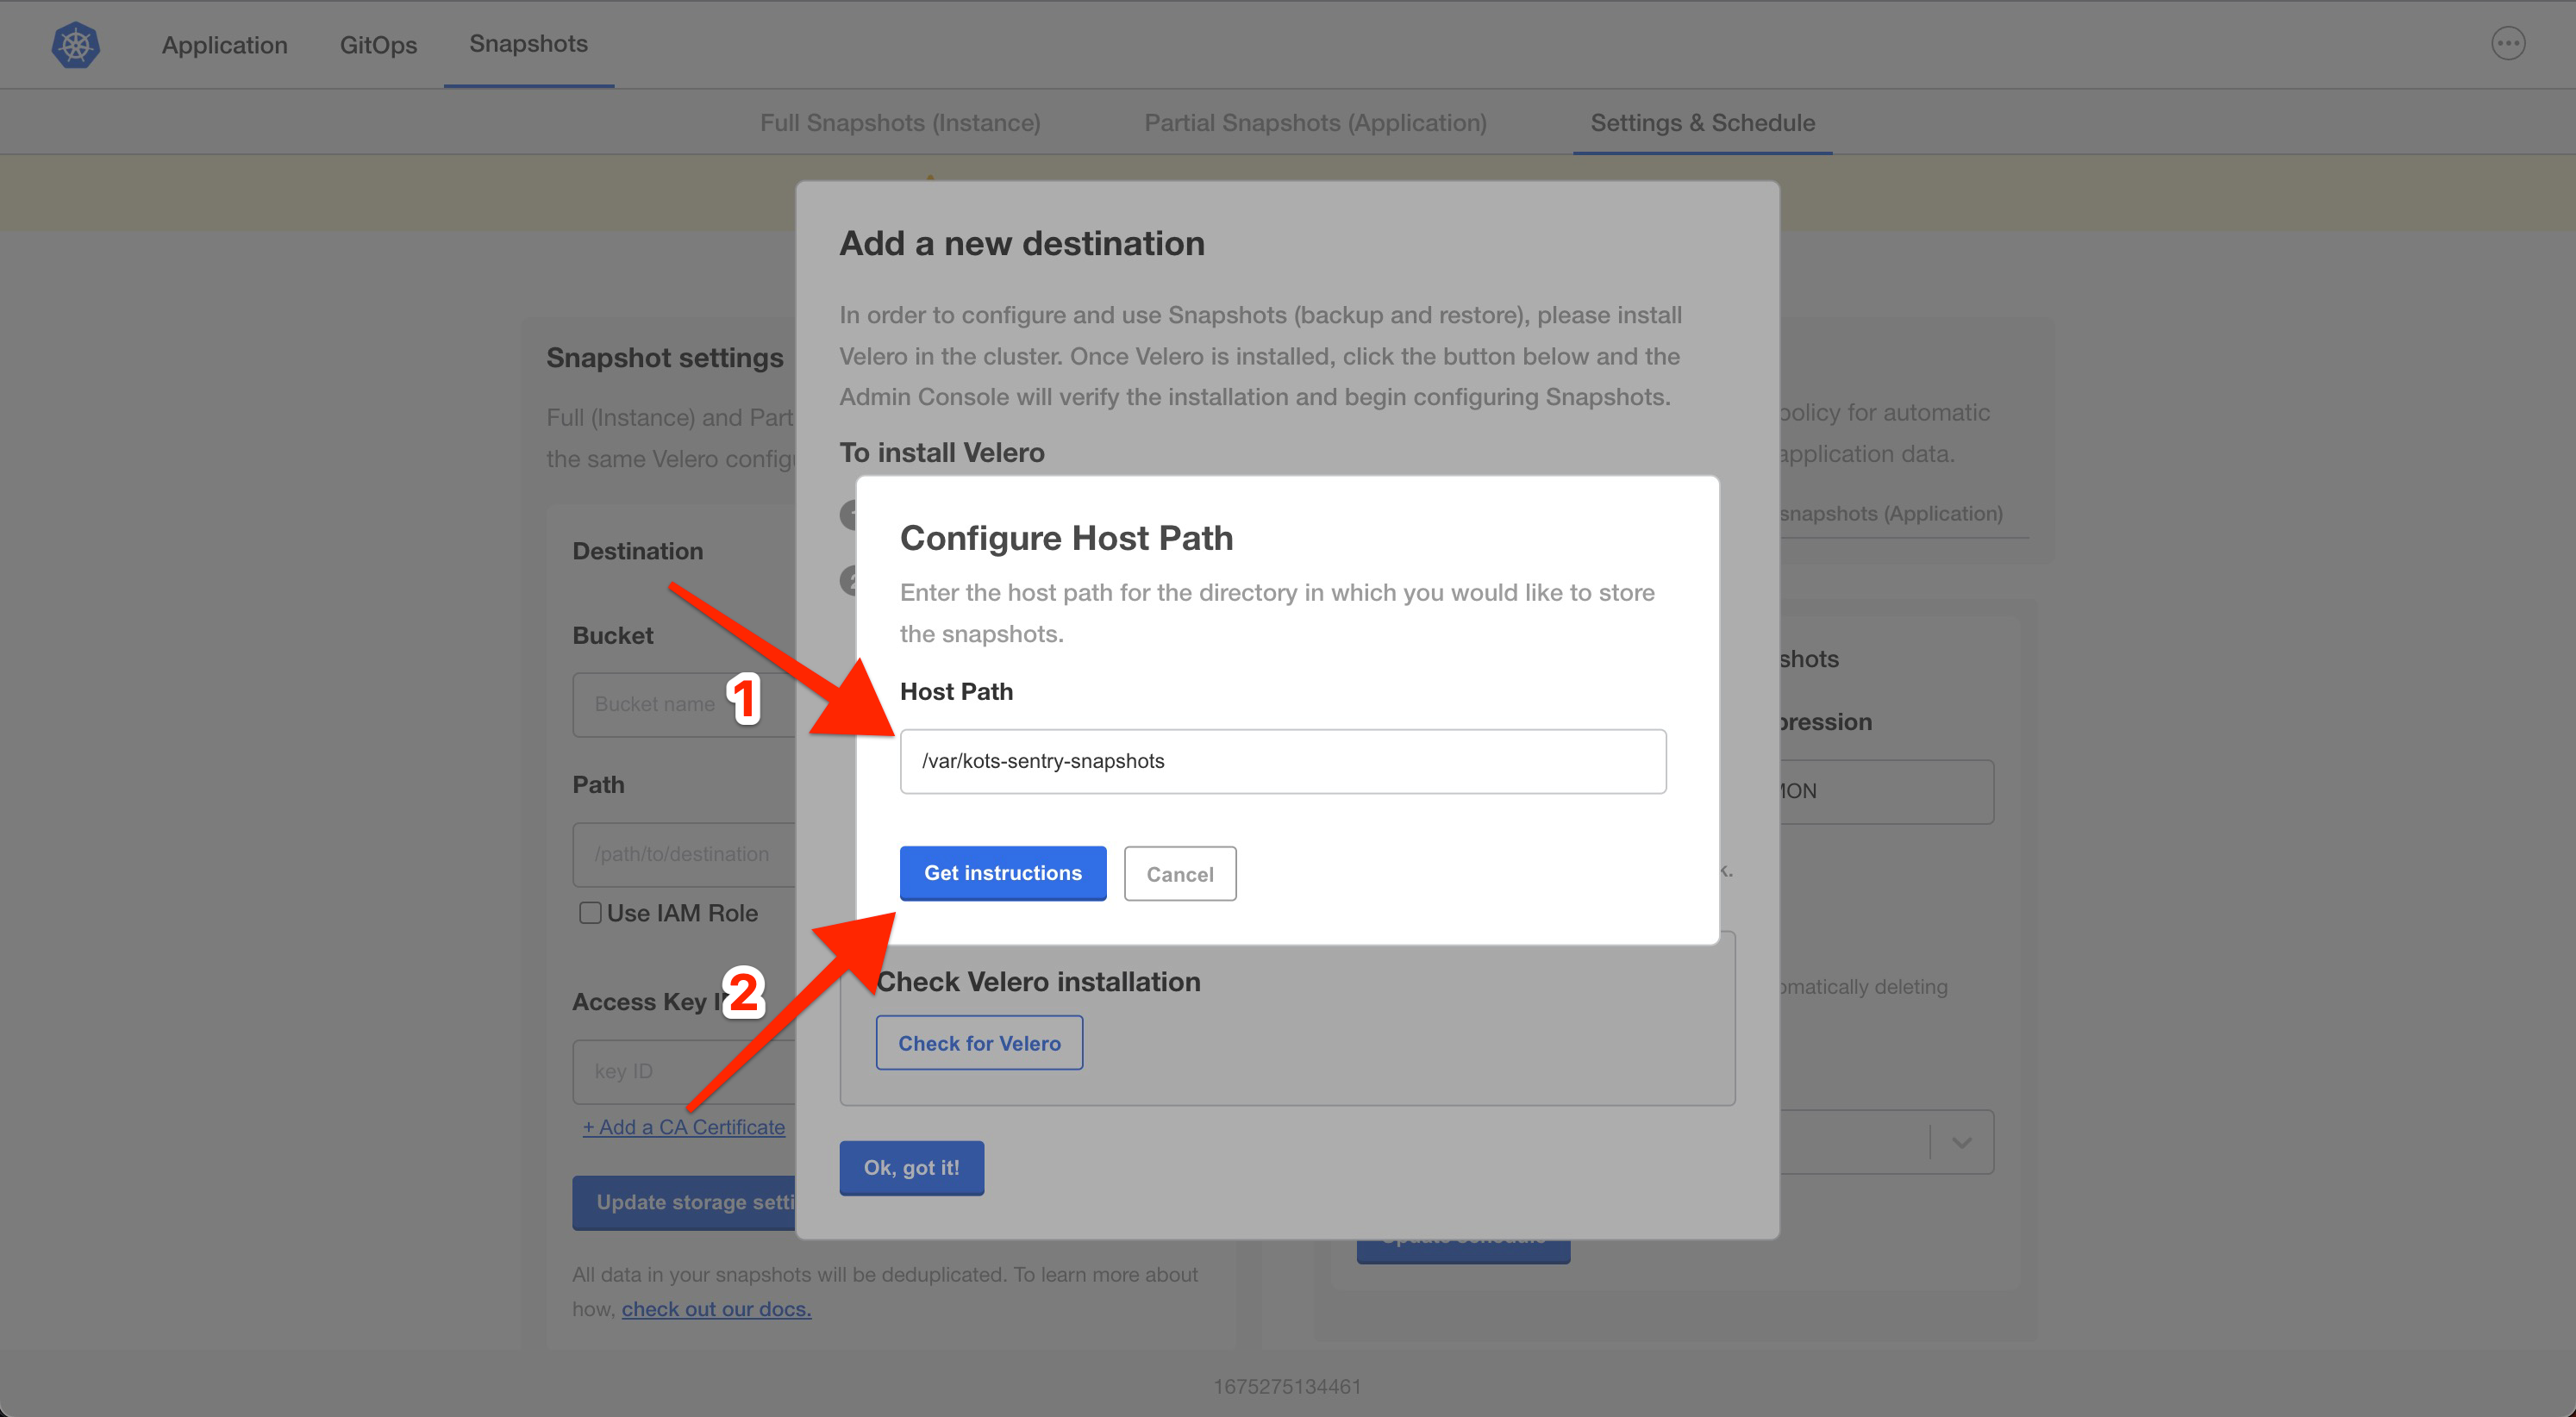
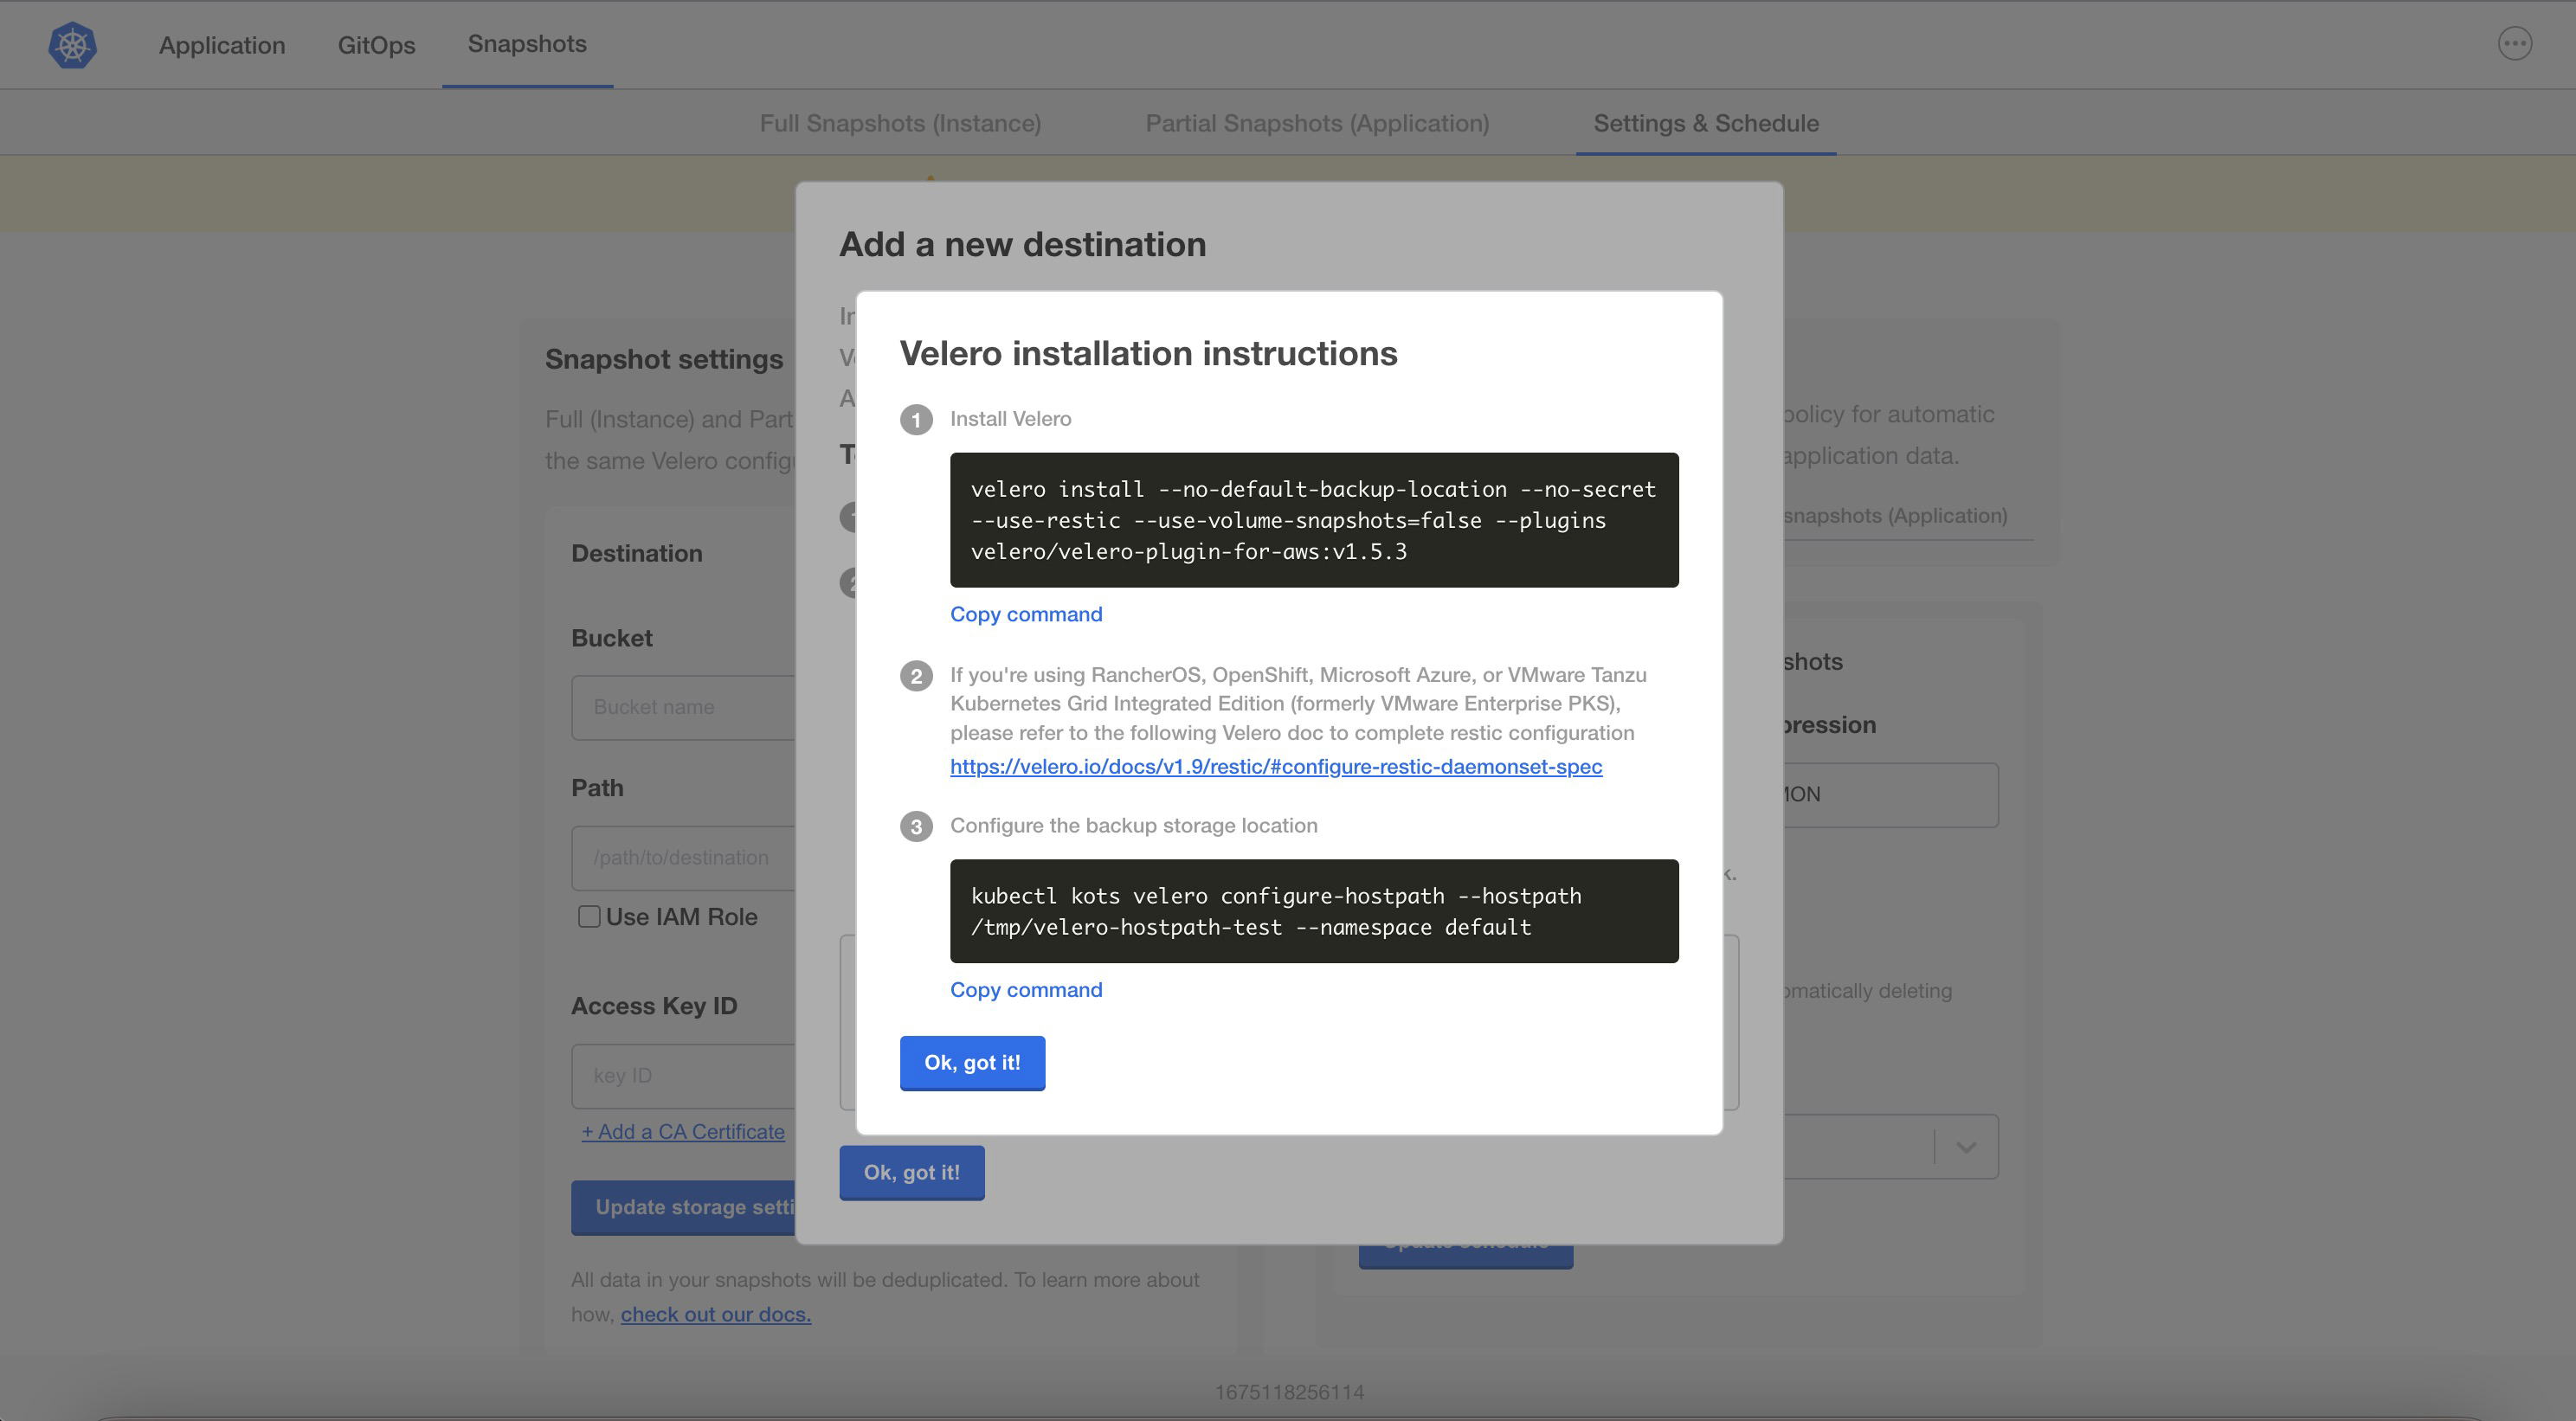
A dialog opens with instructions on how to set up Velero with the specified host path configuration.
-
Follow the steps in the dialog to install Velero and configure the storage destination.
-
Return to the Admin Console and either click Check for Velero or refresh the page to verify that the Velero installation is detected.
Next steps
- (Existing Clusters Only) Configure Velero namespace access if you are using minimal RBAC. See Configure Namespace Access and Memory Limit.
- (Optional) Increase the default memory limits. See Configure Namespace Access and Memory Limit.
- Create or schedule backups. See Create and Schedule Backups.