Install the Replicated SDK
This topic describes the methods for distributing and installing the Replicated SDK.
It includes information about how to install the SDK alongside Helm charts or Kubernetes manifest-based applications using the Helm CLI or a Replicated installer (Replicated KOTS, kURL, Embedded Cluster). It also includes information about installing the SDK as a standalone component in integration mode.
For information about installing the SDK in air gap mode, see Install the SDK in Air Gap Environments.
Requirement
To install the SDK with a Replicated installer, KOTS v1.104.0 or later and the SDK version 1.0.0-beta.12 or later are required. You can verify the version of KOTS installed with kubectl kots version. For Replicated Embedded Cluster installations, you can see the version of KOTS that is installed by your version of Embedded Cluster in the Embedded Cluster Release Notes.
Install the SDK as a Subchart
When included as a dependency of your application Helm chart, the SDK is installed as a subchart alongside the application.
To install the SDK as a subchart:
-
In your application Helm chart
Chart.yamlfile, add the YAML below to declare the SDK as a dependency. If your application is installed as multiple charts, declare the SDK as a dependency of the chart that customers install first. Do not declare the SDK in more than one chart.# Chart.yaml
dependencies:
- name: replicated
repository: oci://registry.replicated.com/library
version: 1.14.0For the latest version information for the Replicated SDK, see the replicated-sdk repository in GitHub.
-
Update the
charts/directory:helm dependency updatenoteIf you see a 401 Unauthorized error after running
helm dependency update, run the following command to remove credentials from the Replicated registry, then re-runhelm dependency update:helm registry logout registry.replicated.comFor more information, see 401 Unauthorized Error When Updating Helm Dependencies.
-
Package the Helm chart into a
.tgzarchive:helm package . -
Add the chart archive to a new release. For more information, see Manage Releases with the CLI or Managing Releases with the Vendor Portal.
-
(Optional) Add a KOTS HelmChart custom resource to the release to support installation with Embedded Cluster, KOTS, or kURL. For more information, see Configure the HelmChart Custom Resource v2.
-
Save and promote the release to an internal-only channel used for testing, such as the default Unstable channel.
-
Install the release using Helm or a Replicated installer. For more information, see:
-
Confirm that the SDK was installed by seeing that the
replicatedDeployment was created:kubectl get deploy --namespace NAMESPACEWhere
NAMESPACEis the namespace in the cluster where the application and the SDK are installed.Example output:
NAME         READY   UP-TO-DATE   AVAILABLE   AGE
my-app       1/1     1            1           35s
replicated   1/1     1            1           35s
Install the SDK Alongside a Kubernetes Manifest-Based Application
For applications that use Kubernetes manifest files instead of Helm charts, the SDK Helm chart can be added to a release and then installed by KOTS alongside the application.
To install the SDK with a Replicated installer, KOTS v1.104.0 or later and the SDK version 1.0.0-beta.12 or later are required. You can verify the version of KOTS installed with kubectl kots version. For Replicated Embedded Cluster installations, you can see the version of KOTS that is installed by your version of Embedded Cluster in the Embedded Cluster Release Notes.
To add the SDK Helm chart to a release for a Kubernetes manifest-based application:
-
Install the Helm CLI using Homebrew:
brew install helmFor more information, including alternative installation options, see Install Helm in the Helm documentation.
-
Download the
.tgzchart archive for the SDK Helm chart:helm pull oci://registry.replicated.com/library/replicated --version SDK_VERSIONWhere
SDK_VERSIONis the version of the SDK to install. For a list of available SDK versions, see the replicated-sdk repository in GitHub.The output of this command is a
.tgzfile with the naming conventionCHART_NAME-CHART_VERSION.tgz. For example,replicated-1.5.0.tgz.For more information and additional options, see Helm Pull in the Helm documentation.
-
Add the SDK
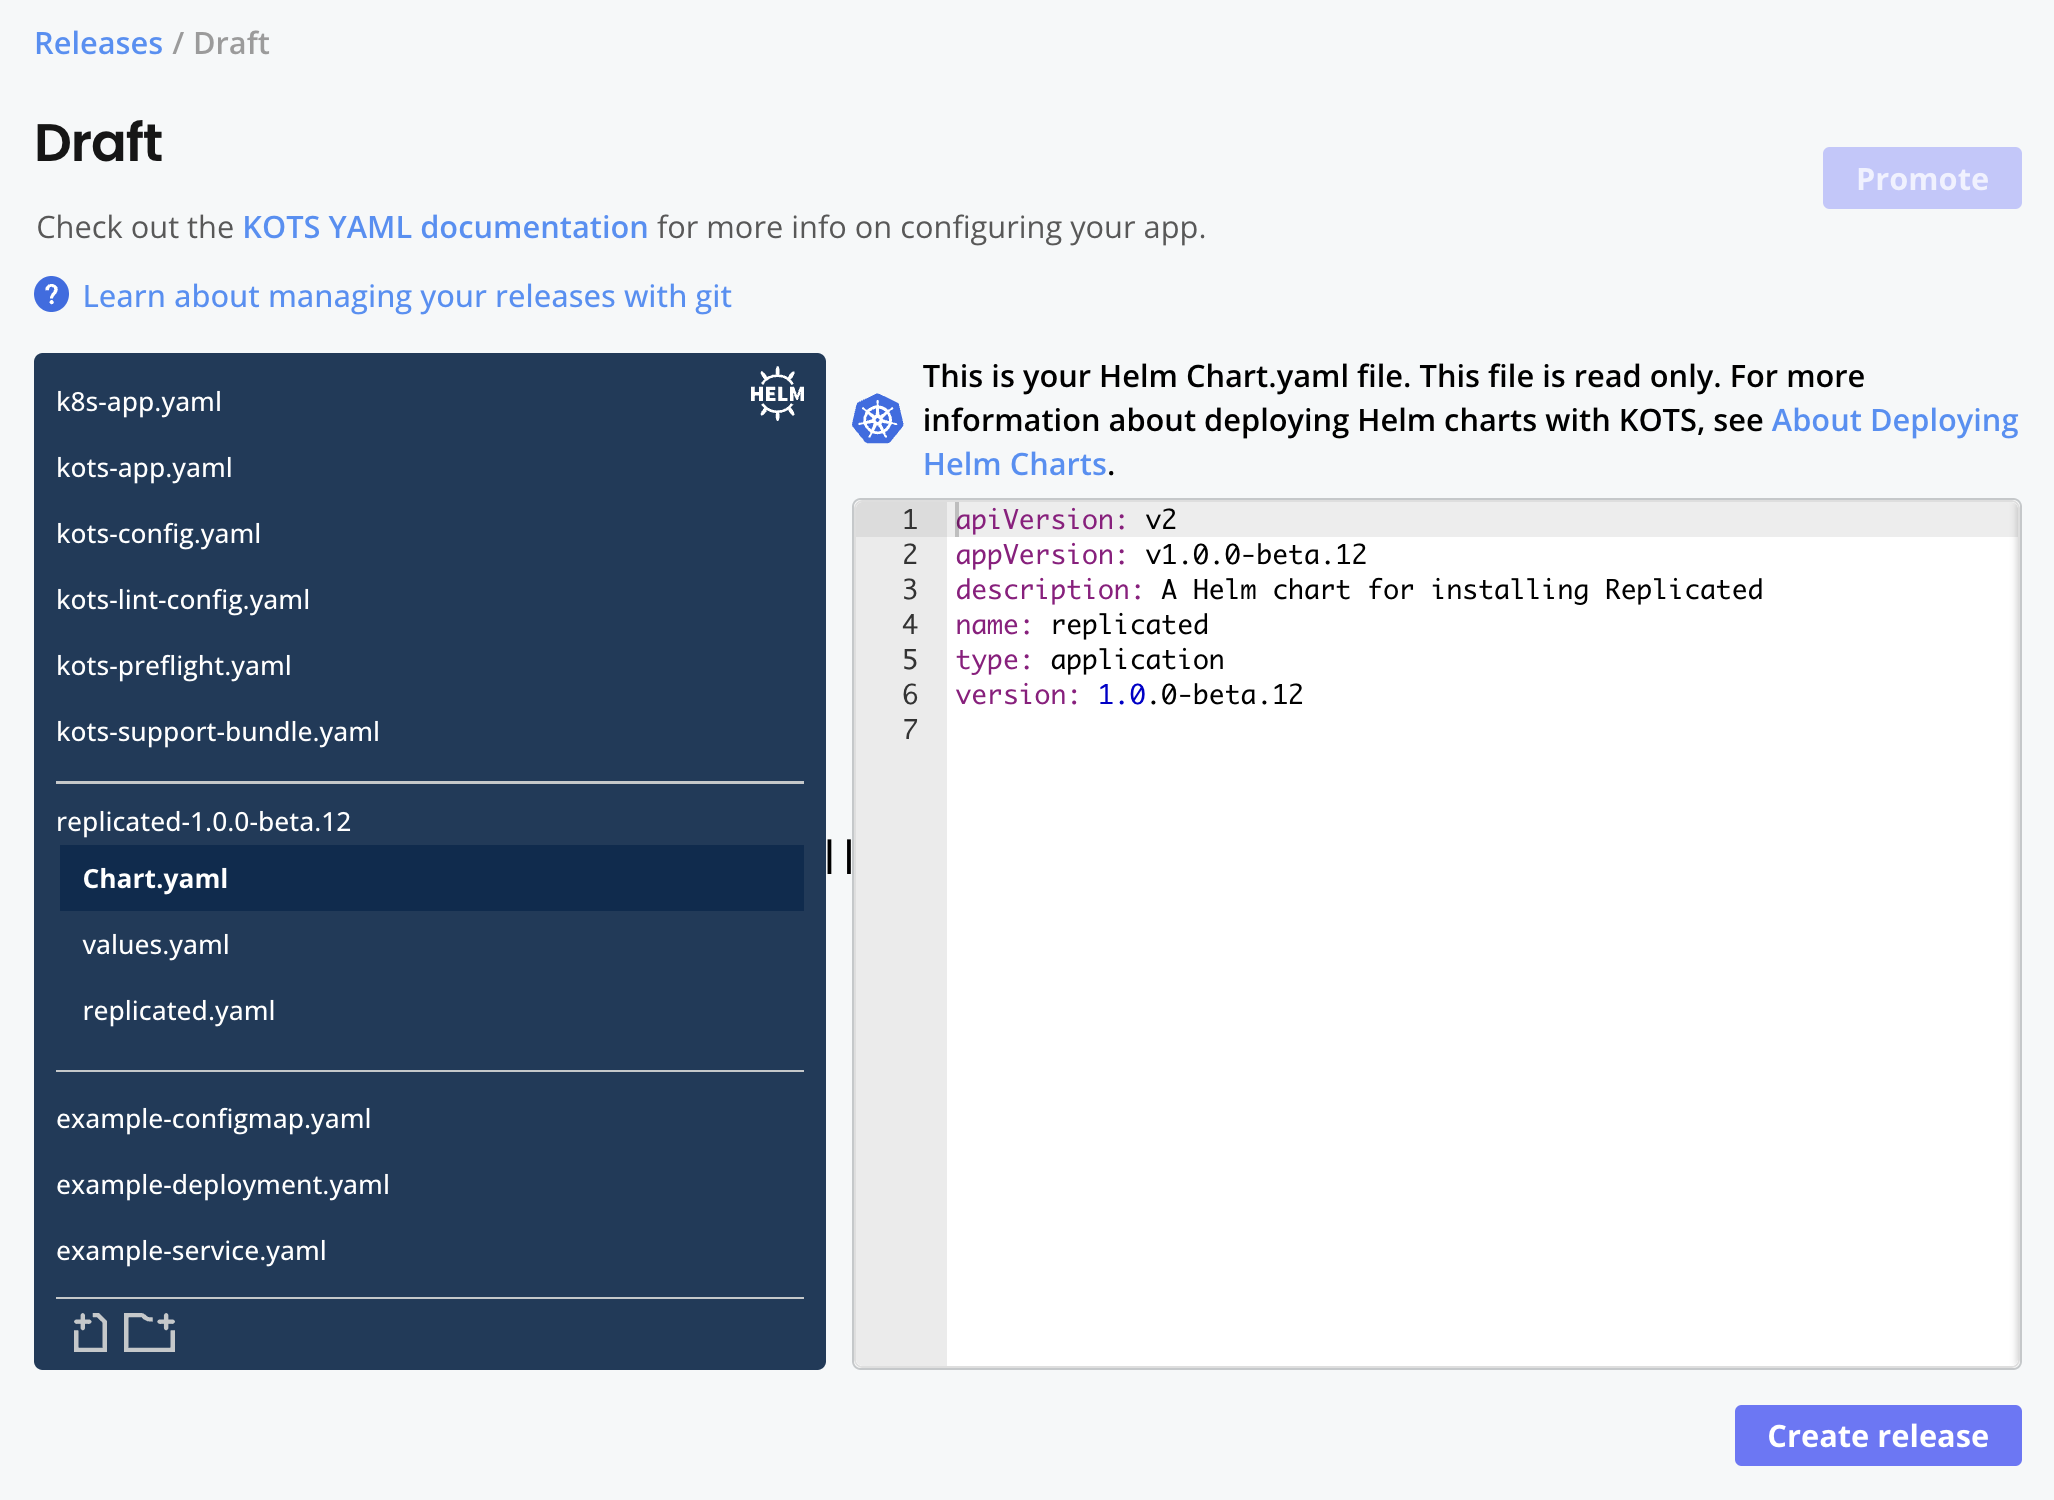
.tgzchart archive to a new release. For more information, see Manage Releases with the CLI or Managing Releases with the Vendor Portal.The following shows an example of the SDK Helm chart added to a draft release for a standard manifest-based application:

-
If one was not created automatically, add a KOTS HelmChart custom resource to the release. HelmChart custom resources have
apiVersion: kots.io/v1beta2andkind: HelmChart.Example:
apiVersion: kots.io/v1beta2
kind: HelmChart
metadata:
  name: replicated
spec:
# chart identifies a matching chart from a .tgz
  chart:
    # for name, enter replicated
    name: replicated
    # for chartversion, enter the version of the
    # SDK Helm chart in the release
    chartVersion: 1.8.1
As shown in the example above, the HelmChart custom resource requires the name and version of the SDK Helm chart that you added to the release:
chart.name: The name of the SDK Helm chart isreplicated. You can find the chart name in thenamefield of the SDK Helm chartChart.yamlfile.chart.chartVersion: The chart version varies depending on the version of the SDK that you pulled and added to the release. You can find the chart version in theversionfield of SDK Helm chartChart.yamlfile.
For more information about configuring the HelmChart custom resource to support KOTS installations, see About Distributing Helm Charts with KOTS and HelmChart v2.
-
Save and promote the release to an internal-only channel used for testing, such as the default Unstable channel.
-
Install the release using a Replicated installer. For more information, see:
-
Confirm that the SDK was installed by seeing that the
replicatedDeployment was created:kubectl get deploy --namespace NAMESPACEWhere
NAMESPACEis the namespace in the cluster where the application, the Admin Console, and the SDK are installed.Example output:
NAME         READY   UP-TO-DATE   AVAILABLE   AGE
kotsadm      1/1     1            1           112s
my-app       1/1     1            1           28s
replicated   1/1     1            1           27s
Install the SDK in Integration Mode
You can install the Replicated SDK in integration mode to develop locally against the SDK API without needing to add the SDK to your application, create a release in the Replicated Vendor Portal, or make changes in your environment. You can also use integration mode to test sending instance data to the Vendor Portal, including any custom metrics that you configure.
To use integration mode, install the Replicated SDK as a standalone component using a valid Development license created in the Vendor Portal. After you install in integration mode, the SDK provides default mock data for requests to the SDK API app endpoints. Requests to the license endpoints use the real data from your Development license.
To install the SDK in integration mode:
-
Create a Development license that you can use to install the SDK in integration mode:
-
In the Vendor Portal, go to Customers and click Create customer.
-
Complete the following fields:
-
For Customer name, add a name for the customer.
-
For Assigned channel, assign the customer to the channel that you use for testing. For example, Unstable.
-
For Customer type, select Development.
-
For Customer email, add the email address that you want to use for the license.
-
For Install types, ensure that the Existing Cluster (Helm CLI) option is enabled.
-
(Optional) Add any license field values that you want to use for testing:
-
For Expiration policy, you can add an expiration date for the license.
-
For Custom fields, you can add values for any custom license fields in your application. For information about how to create custom license fields, see Manage Customer License Fields.
-
-
-
Click Save Changes.
-
-
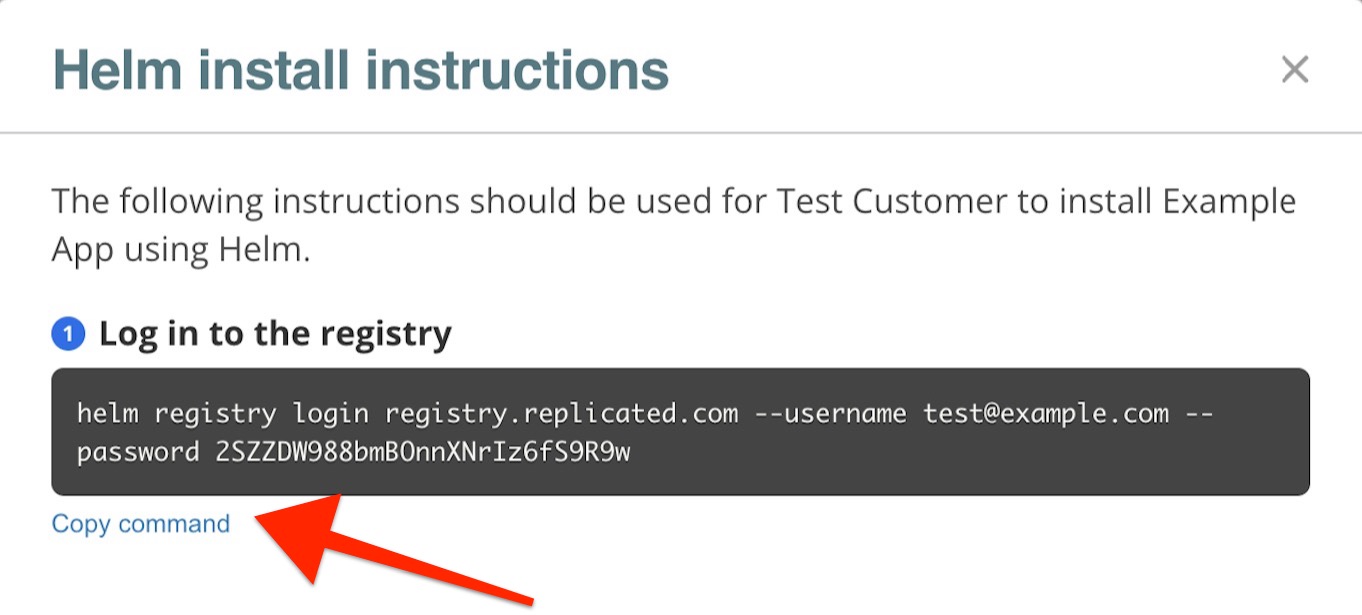
On the Manage customer page for the customer you created, click Helm install instructions.

-
In the Helm install instructions dialog, copy and run the command to log in to the Replicated registry.

-
From the same dialog, copy and run the command to install the SDK in integration mode:

-
Make requests to the SDK API from your application. You can access the SDK API for testing by forwarding the API service to your local machine. For more information, see Port Forwarding the SDK API Service.
Troubleshoot
401 Unauthorized Error When Updating Helm Dependencies
Symptom
You see an error message similar to the following after adding the Replicated SDK as a dependency in your Helm chart then running helm dependency update:
Error: could not download oci://registry.replicated.com/library/replicated-sdk: failed to authorize: failed to fetch oauth token: unexpected status from GET request to https://registry.replicated.com/v2/token?scope=repository%3Alibrary%2Freplicated-sdk%3Apull&service=registry.replicated.com: 401 Unauthorized
Cause
When you run helm dependency update, Helm attempts to pull the Replicated SDK chart from the Replicated registry. An error can occur if you are already logged in to the Replicated registry with a license that has expired, such as when testing application releases.
Solution
To solve this issue:
-
Run the following command to remove login credentials for the Replicated registry:
helm registry logout registry.replicated.com -
Re-run
helm dependency updatefor your Helm chart.