Run Preflight Checks for Helm Installations
This topic describes how to use the preflight kubectl plugin to run preflight checks for applications installed with the Helm CLI.
Overview
For applications installed with the Helm CLI, your users can optionally run preflight checks using the open source preflight kubectl plugin before they run helm install.
The preflight plugin requires a preflight check specification as input. For Helm chart-based applications, the specification is defined in a Secret in the Helm chart templates directory. For information about how to configure preflight checks for your application, see Define Preflight Checks.
To run preflight checks that are defined in your application Helm chart templates, your users run helm template to render the Helm chart templates and then provide the result to the preflight plugin as stdin. The preflight plugin automatically filters the stream of stdout from the helm template command to find and run any preflight specifications.
Prerequisite
The preflight kubectl plugin is required to run preflight checks for Helm CLI installations. The preflight plugin is a client-side utility that adds a single binary to the path.
To install the preflight plugin:
-
Mac: Replicated recommends using Homebrew:
brew install preflight -
Windows / Linux: Use Krew:
curl https://krew.sh/preflight | bash
For information about the preflight plugin, including additional installation options, see Getting Started in the open source Troubleshoot documentation.
Command
helm template HELM_CHART | kubectl preflight -
Where HELM_CHART is the Helm chart that contains the preflight specification.
For all available options with this command, see Run Preflight Checks using the CLI in the open source Troubleshoot documentation.
Examples:
helm template gitea-1.0.6.tgz | kubectl preflight -
helm template gitea | kubectl preflight -
helm template oci://myregistry.io/org/examplechart | kubectl preflight -
Run Preflight Checks from a Release
When you promote a release that contains one or more Helm charts, the Helm charts are automatically pushed to the Replicated registry. To run preflight checks before installing a release, your users must first log in to the Replicated registry where they can access your application Helm chart containing the preflight specification.
To run preflights checks from a release before installation:
-
In the Vendor Portal, go to the Customers page. Click on the name of the target customer.
-
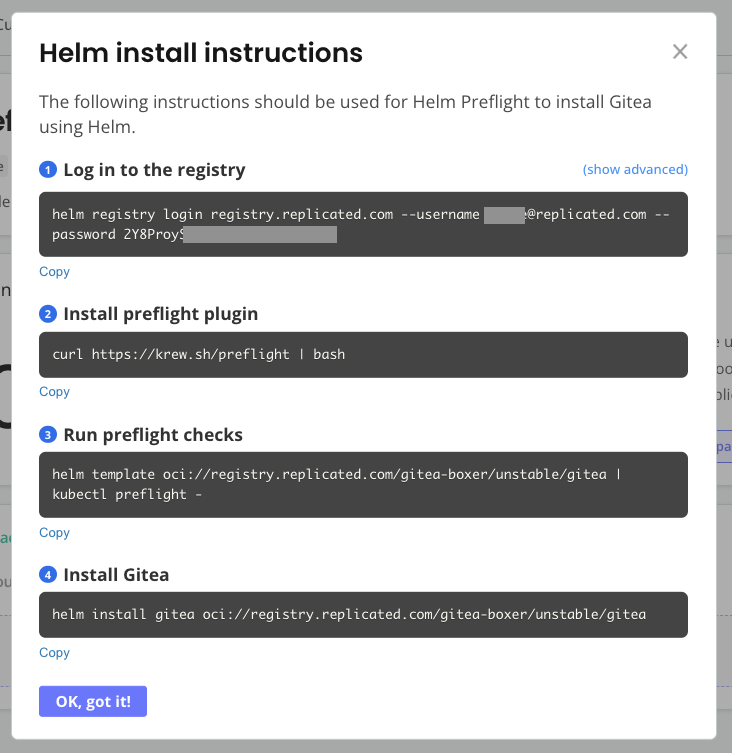
On the landing page for the customer, click Helm install instructions.
The Helm install instructions dialog opens:

-
Run the commands provided in the dialog:
-
Run the first command to log in to the Replicated registry:
helm registry login registry.replicated.com --username USERNAME --password PASSWORDWhere:
USERNAMEis the customer's email address.PASSWORDis the customer's license ID.
Example:
helm registry login registry.replicated.com --username [email protected] password 1234abcd -
Run the second command to install the kubectl plugin:
-
Mac:
brew install preflight -
Windows / Linux:
curl https://krew.sh/preflight | bash
-
-
Run the third command to run preflight checks:
helm template oci://registry.replicated.com/APP_SLUG/CHANNEL/CHART | kubectl preflight -Where:
APP_SLUGis the name of the application.CHANNELis the lowercased name of the release channel.CHARTis the name of the Helm chart.
Examples:
helm template oci://registry.replicated.com/gitea-app/unstable/gitea | kubectl preflight -helm template oci://registry.replicated.com/gitea-app/unstable/gitea --values values.yaml | kubectl preflight -For all available options with this command, see Run Preflight Checks using the CLI in the open source Troubleshoot documentation.
-
(Optional) Run the fourth command to install the application. For more information, see Install with Helm.
-
(Optional) Save Preflight Check Results
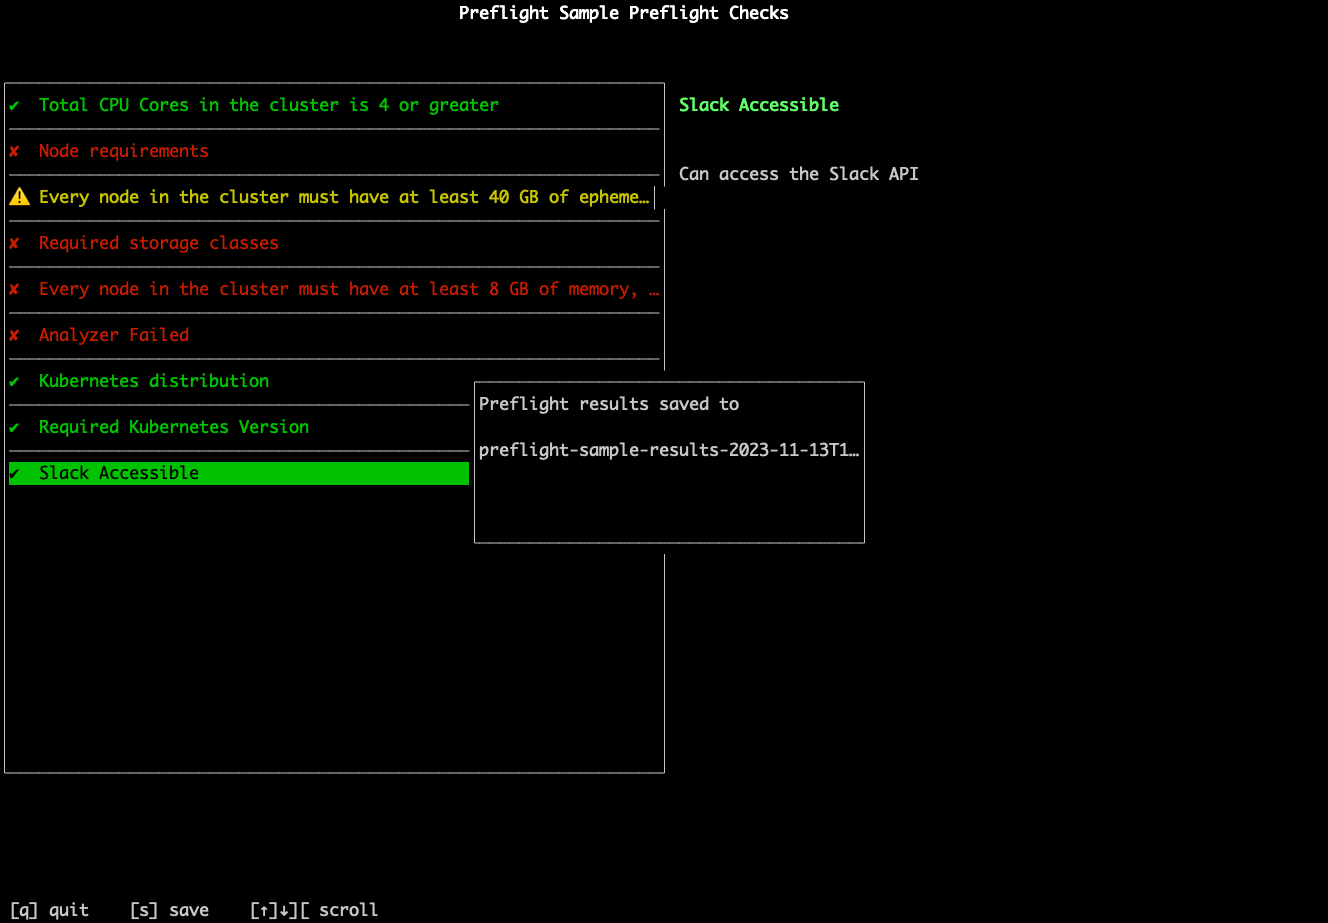
The output of the preflight plugin shows the success, warning, or fail message for each preflight, depending on how they were configured. You can ask your users to send you the results of the preflight checks if needed.
To save the results of preflight checks to a .txt file, users can can press s when viewing the results from the CLI, as shown in the example below:
