Embedded Cluster Overview
This topic provides an introduction to Replicated Embedded Cluster, including a description of the built-in extensions installed by Embedded Cluster, an overview of the Embedded Cluster single-node and multi-node architecture, and requirements and limitations.
If you are instead looking for information about creating Kubernetes Installers with Replicated kURL, see the Replicated kURL section.
Overview
Replicated Embedded Cluster allows you to distribute a Kubernetes cluster and your application together as a single appliance, making it easy for enterprise users to install, update, and manage the application and the cluster in tandem. Embedded Cluster is based on the open source Kubernetes distribution k0s. For more information, see the k0s documentation.
For software vendors, Embedded Cluster provides a Config for defining characteristics of the cluster that will be created in the customer environment. Additionally, each version of Embedded Cluster includes a specific version of Replicated KOTS, ensuring compatibility between KOTS and the cluster. For enterprise users, cluster updates are done automatically at the same time as application updates, allowing users to more easily keep the cluster up-to-date without needing to use kubectl.
Architecture
This section describes the Embedded Cluster architecture, including the built-in extensions deployed by Embedded Cluster.
Single-Node Architecture
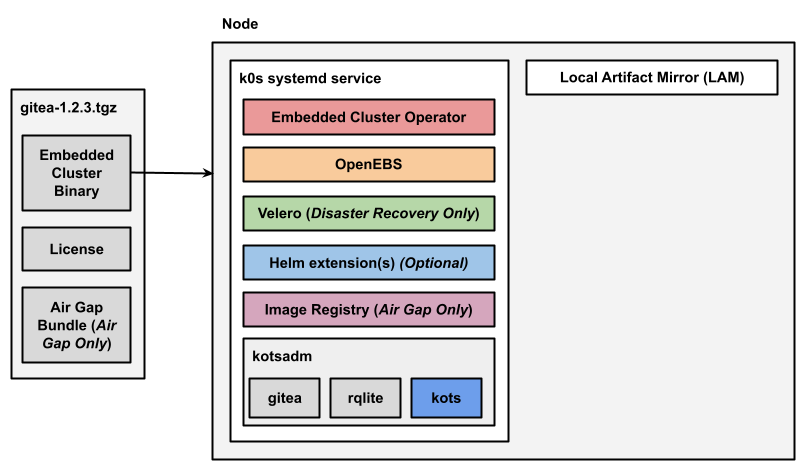
The following diagram shows the architecture of a single-node Embedded Cluster installation for an application named Gitea:

View a larger version of this image
As shown in the diagram above, the user downloads the Embedded Cluster installation assets as a .tgz in their installation environment. These installation assets include the Embedded Cluster binary, the user's license file, and (for air gap installations) an air gap bundle containing the images needed to install and run the release in an environment with limited or no outbound internet access.
When the user runs the Embedded Cluster install command, the Embedded Cluster binary first installs the k0s cluster as a systemd service.
After all the Kubernetes components for the cluster are available, the Embedded Cluster binary then installs the Embedded Cluster built-in extensions. For more information about these extensions, see Built-In Extensions below.
Any Helm extensions that were included in the extensions field of the Embedded Cluster Config are also installed. The namespace or namespaces where Helm extensions are installed is defined by the vendor in the Embedded Cluster Config.
Finally, Embedded Cluster also installs Local Artifact Mirror (LAM). In air gap installations, LAM is used to store and update images.
Multi-Node Architecture
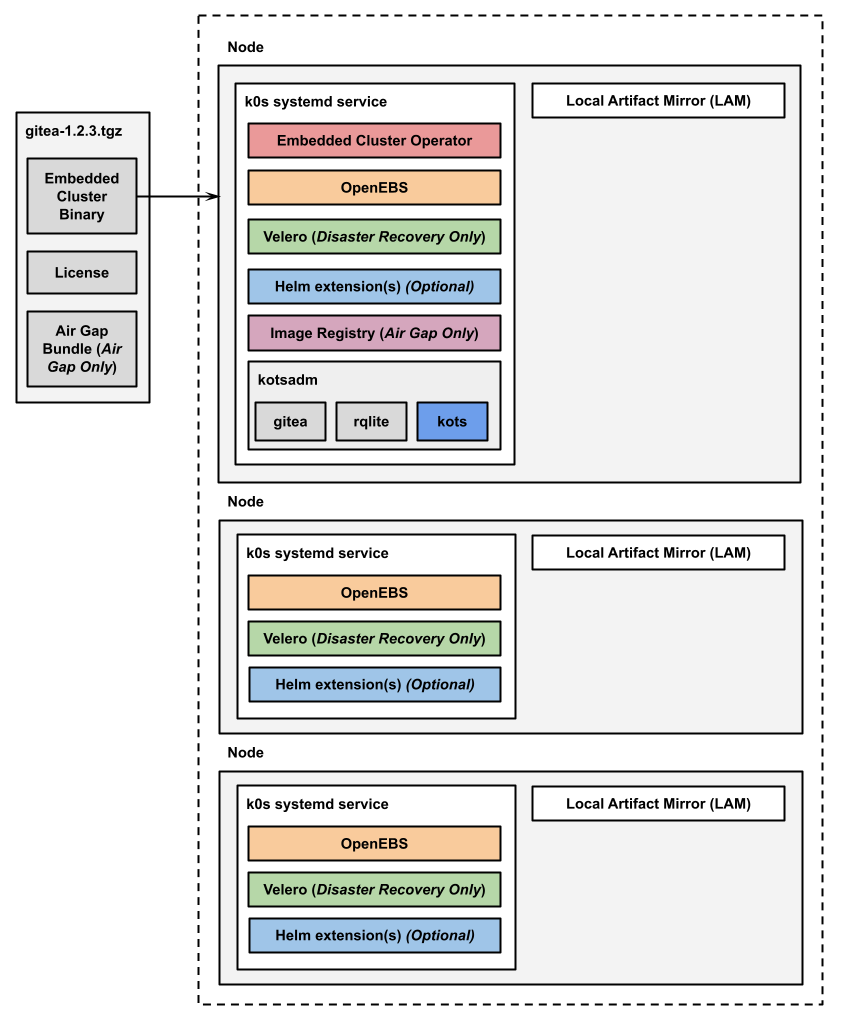
The following diagram shows the architecture of a multi-node Embedded Cluster installation:

View a larger version of this image
As shown in the diagram above, in multi-node installations, the Embedded Cluster Operator, KOTS, and the image registry for air gap installations are all installed on one controller node.
For installations that include disaster recovery with Velero, the Velero Node Agent runs on each node in the cluster. The Node Agent is a Kubernetes DaemonSet that performs backup and restore tasks such as creating snapshots and transferring data during restores.
Additionally, any Helm extensions that you include in the Embedded Cluster Config are installed in the cluster depending on the given chart and how it is configured to be deployed.
Multi-Node Architecture with High Availability
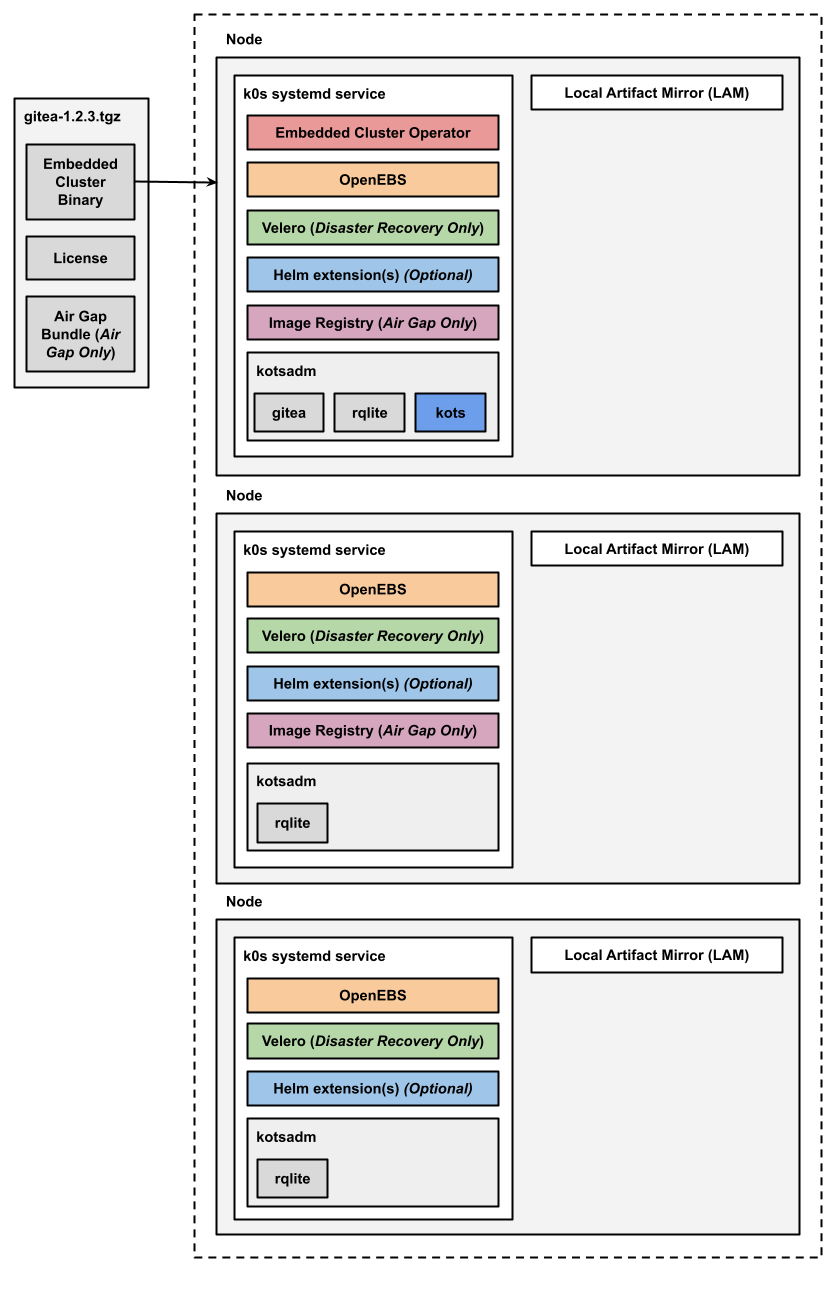
The following diagram shows the architecture of an HA multi-node Embedded Cluster installation:

View a larger version of this image
As shown in the diagram above, in HA installations with Embedded Cluster:
- A single replica of the Embedded Cluster Operator is deployed and runs on a controller node.
- A single replica of the KOTS Admin Console is deployed and runs on a controller node.
- Three replicas of rqlite are deployed in the kotsadm namespace. Rqlite is used by KOTS to store information such as support bundles, version history, application metadata, and other small amounts of data needed to manage the application.
- For installations that include disaster recovery, the Velero pod is deployed on one node. The Velero Node Agent runs on each node in the cluster. The Node Agent is a Kubernetes DaemonSet that performs backup and restore tasks such as creating snapshots and transferring data during restores.
- For air gap installations, two replicas of the air gap image registry are deployed.
Any Helm extensions that you include in the Embedded Cluster Config are installed in the cluster depending on the given chart and whether or not it is configured to be deployed with high availability.
Built-In Extensions
Embedded Cluster includes several built-in extensions. The built-in extensions provide capabilities such as application management and storage. Each built-in extension is installed in its own namespace.
The built-in extensions installed by Embedded Cluster include:
-
Embedded Cluster Operator: The Operator is used for reporting purposes as well as some clean up operations.
-
KOTS: Embedded Cluster installs the KOTS Admin Console in the kotsadm namespace. End customers use the Admin Console to configure and install the application. Rqlite is also installed in the kotsadm namespace alongside KOTS. Rqlite is a distributed relational database that uses SQLite as its storage engine. KOTS uses rqlite to store information such as support bundles, version history, application metadata, and other small amounts of data needed to manage the application. For more information about rqlite, see the rqlite website.
-
OpenEBS: Embedded Cluster uses OpenEBS to provide local PersistentVolume (PV) storage, including the PV storage for rqlite used by KOTS. For more information, see the OpenEBS documentation.
-
(Disaster Recovery Only) Velero: If the installation uses the Embedded Cluster disaster recovery feature, Embedded Cluster installs Velero, which is an open-source tool that provides backup and restore functionality. For more information about Velero, see the Velero documentation. For more information about the disaster recovery feature, see Disaster Recovery for Embedded Cluster (Alpha).
-
(Air Gap Only) Image registry: For air gap installations in environments with limited or no outbound internet access, Embedded Cluster installs an image registry where the images required to install and run the application are pushed. For more information about installing in air-gapped environments, see Air Gap Installation with Embedded Cluster.
Comparison to kURL
Embedded Cluster is a successor to Replicated kURL. Compared to kURL, Embedded Cluster offers several improvements such as:
- Significantly faster installation, updates, and node joins
- A redesigned Admin Console UI for managing the cluster
- Improved support for multi-node clusters
- One-click updates of both the application and the cluster at the same time
Additionally, Embedded Cluster automatically deploys several built-in extensions like KOTS and OpenEBS to provide capabilities such as application management and storage. This represents an improvement over kURL because vendors distributing their application with Embedded Cluster no longer need choose and define various add-ons in the installer spec. For additional functionality that is not included in the built-in extensions, such as an ingress controller, vendors can provide their own extensions that will be deployed alongside the application.
Requirements
System Requirements
-
Linux operating system
-
x86-64 architecture
-
systemd
-
At least 2GB of memory and 2 CPU cores
-
The disk on the host must have a maximum P99 write latency of 10 ms. This supports etcd performance and stability. For more information about the disk write latency requirements for etcd, see Disks in Hardware recommendations and What does the etcd warning “failed to send out heartbeat on time” mean? in the etcd documentation.
-
The user performing the installation must have root access to the machine, such as with
sudo. -
The data directory used by Embedded Cluster must have 40Gi or more of total space and be less than 80% full. By default, the data directory is
/var/lib/embedded-cluster. The directory can be changed by passing the--data-dirflag with the Embedded Clusterinstallcommand. For more information, see install.Note that in addition to the primary data directory, Embedded Cluster creates directories and files in the following locations:
/etc/cni/etc/k0s/opt/cni/opt/containerd/run/calico/run/containerd/run/k0s/sys/fs/cgroup/kubepods/sys/fs/cgroup/system.slice/containerd.service/sys/fs/cgroup/system.slice/k0scontroller.service/usr/libexec/k0s/var/lib/calico/var/lib/cni/var/lib/containers/var/lib/kubelet/var/log/calico/var/log/containers/var/log/embedded-cluster/var/log/pods/usr/local/bin/k0s
-
(Online installations only) Access to replicated.app and proxy.replicated.com or your custom domain for each
-
Embedded Cluster is based on k0s, so all k0s system requirements and external runtime dependencies apply. See System requirements and External runtime dependencies in the k0s documentation.
Port Requirements
This section lists the ports used by Embedded Cluster. These ports must be open and available for both single- and multi-node installations.
Ports Used by Local Processes
The following ports must be open and available for use by local processes running on the same node. It is not necessary to create firewall openings for these ports.
- 2379/TCP
- 7443/TCP
- 9099/TCP
- 10248/TCP
- 10257/TCP
- 10259/TCP
Ports Required for Bidirectional Communication Between Nodes
The following ports are used for bidirectional communication between nodes.
For multi-node installations, create firewall openings between nodes for these ports.
For single-node installations, ensure that there are no other processes using these ports. Although there is no communication between nodes in single-node installations, these ports are still required.
- 2380/TCP
- 4789/UDP
- 6443/TCP
- 9091/TCP
- 9443/TCP
- 10249/TCP
- 10250/TCP
- 10256/TCP
Admin Console Port
The KOTS Admin Console requires that port 30000/TCP is open and available. Create a firewall opening for port 30000/TCP so that the Admin Console can be accessed by the end user.
Additionally, port 30000 must be accessible by nodes joining the cluster.
If port 30000 is occupied, you can select a different port for the Admin Console during installation. For more information, see install.
LAM Port
The Local Artifact Mirror (LAM) requires that port 50000/TCP is open and available.
If port 50000 is occupied, you can select a different port for the LAM during installation. For more information, see install.
Unix Accounts for Kubernetes Components
During installation, Embedded Cluster automatically creates the following Unix accounts that are required by internal Kubernetes components:
- etcd: Used by the Kubernetes etcd database, which stores cluster state.
- konnectivity-server: Used by the Konnectivity service, which facilitates secure communication between internal components.
- kube-apiserver: Used by the Kubernetes API server.
- kube-scheduler: Used by the Kubernetes scheduler to schedule workloads such as pods.
No action is required to create these roles. Removing them will make the cluster non-functional.
For more information about the internal Kubernetes components, see Kubernetes Components in the Kubernetes documentation.
For more information about the Konnectivity service, see Set up Konnectivity service in the Kubernetes documentation.
Limitations
Embedded Cluster has the following limitations:
-
Migration from kURL: We are helping several customers migrate from kURL to Embedded Cluster. For more information about migrating from kURL to Embedded Cluster, including key considerations before migrating and an example step-by-step migration process, see Replicated kURL to Embedded Cluster Migration. For additional questions and to begin the migration process for your application, reach out to Alex Parker at [email protected].
-
Disaster recovery is in alpha: Disaster Recovery for Embedded Cluster installations is in alpha. For more information, see Disaster Recovery for Embedded Cluster (Alpha).
-
Partial rollback support: In Embedded Cluster 1.17.0 and later, rollbacks are supported only when rolling back to a version where there is no change to the Embedded Cluster Config compared to the currently-installed version. For example, users can roll back to release version 1.0.0 after upgrading to 1.1.0 only if both 1.0.0 and 1.1.0 use the same Embedded Cluster Config. For more information about how to enable rollbacks for your application in the KOTS Application custom resource, see allowRollback in Application.
-
Changing node hostnames is not supported: After a host is added to a Kubernetes cluster, Kubernetes assumes that the hostname and IP address of the host will not change. If you need to change the hostname or IP address of a node, you must first remove the node from the cluster. For more information about the requirements for naming nodes, see Node name uniqueness in the Kubernetes documentation.
-
Automatic updates not supported: Configuring automatic updates from the Admin Console so that new versions are automatically deployed is not supported for Embedded Cluster installations. For more information, see Configure Automatic Updates.
-
minKotsVersionandtargetKotsVersionnot supported: TheminKotsVersionandtargetKotsVersionfields in the KOTS Application custom resource are not supported for Embedded Cluster installations. This is because each version of Embedded Cluster includes a particular version of KOTS. SettingtargetKotsVersionorminKotsVersionto a version of KOTS that does not coincide with the version that is included in the specified version of Embedded Cluster will cause Embedded Cluster installations to fail with an error message like:Error: This version of App Name requires a different version of KOTS from what you currently have installed. To avoid installation failures, do not use targetKotsVersion or minKotsVersion in releases that support installation with Embedded Cluster. -
Support bundles over 100MB in the Admin Console: Support bundles are stored in rqlite. Bundles over 100MB could cause rqlite to crash, causing errors in the installation. You can still generate a support bundle from the command line. For more information, see Generating Support Bundles for Embedded Cluster.
-
Kubernetes version template functions not supported: The KOTS KubernetesVersion, KubernetesMajorVersion, and KubernetesMinorVersion template functions do not provide accurate Kubernetes version information for Embedded Cluster installations. This is because these template functions are rendered before the Kubernetes cluster has been updated to the intended version. However,
KubernetesVersionis not necessary for Embedded Cluster because vendors specify the Embedded Cluster version, which includes a known Kubernetes version. -
KOTS Auto-GitOps workflow not supported: Embedded Cluster does not support the KOTS Auto-GitOps workflow. If an end-user is interested in GitOps, consider the Helm install method instead. For more information, see Install with Helm.
-
Downgrading Embedded Cluster or Kubernetes not supported: Downgrading the versions of Embedded Cluster or Kubernetes that are installed in the cluster is not supported. However, the Admin Console does not prevent end-users from attempting to downgrade Emebdded Cluster or Kubernetes. To avoid issues in customer installations that could be caused by downgrading, do not promote new application releases with Embedded Cluster or Kubernetes versions that are earlier than the versions used by the previous release.
-
Upgrading by more than one Kubernetes version at a time not supported: Kubernetes does not support upgrading by more than one minor version at a time. However, the Admin Console does not prevent end-users from attempting to upgrade to a release that specifies a Kubernetes version more than one minor version later than what is currently installed. To avoid issues that could be caused by skipping a minor version of Kubernetes, Replicated recommends that you select Prevent this release from being skipped during upgrades when you promote a new application release that increases the Kubernetes version. For more information about required releases, see Release Properties in About Channels and Releases.
-
Templating not supported in Embedded Cluster Config: The Embedded Cluster Config resource does not support the use of Go template functions, including Replicated template functions. This only applies to the Embedded Cluster Config. You can still use template functions in the rest of your release as usual.
-
Policy enforcement on Embedded Cluster workloads is not supported: The Embedded Cluster runs workloads that require higher levels of privilege. If your application installs a policy enforcement engine such as Gatekeeper or Kyverno, ensure that its policies are not enforced in the namespaces used by Embedded Cluster.
-
Installing on STIG- and CIS-hardened OS images is not supported: Embedded Cluster isn't tested on these images, and issues have arisen when trying to install on them. Embedded Cluster version 2.8.0 and later will install in standard SELinux environments by setting appropriate SELinux file contexts on the bin directory and restoring SELinux contexts for the data directory after creation.
-
Single-stack IPv6 not supported: Embedded Cluster does not support installations in single-stack IPv6-only environments. Environments that use IPv4 or dual-stack IPv4/IPv6 networking are supported.