Create and manage environments with CMX
This topic describes how to use Replicated Compatibility Matrix (CMX) to create and manage clusters and VMs.
This topic includes information about creating and managing environments with CMX using the Replicated Vendor Portal or the Replicated CLI. For information about creating and managing clusters with the Vendor API v3, see the clusters section in the Vendor API v3 documentation.
Prerequisites
-
Create an account in the Replicated Vendor Portal. See Create a Vendor Account.
-
Install the Replicated CLI and then authorize the CLI using your vendor account. See Install the Replicated CLI.
-
If you have a contract, you can purchase more credits by going to Compatibility Matrix > Buy additional credits. Otherwise, you can request credits by going to Compatibility Matrix > Request more credits in the Vendor Portal. For more information, see Billing and Credits.
-
Existing accounts must accept the TOS for the trial on the Compatibility Matrix page in the Replicated Vendor Portal.
Create environments
For information about how to create environments with the CLI, see replicated cluster create and replicated vm create.
To create an environment with CMX from the Vendor Portal:
-
In the Vendor Portal, go to Compatibility Matrix.
-
Click Create and choose Create Kubernetes cluster or Create VM:
-
Create Kubernetes cluster:
-
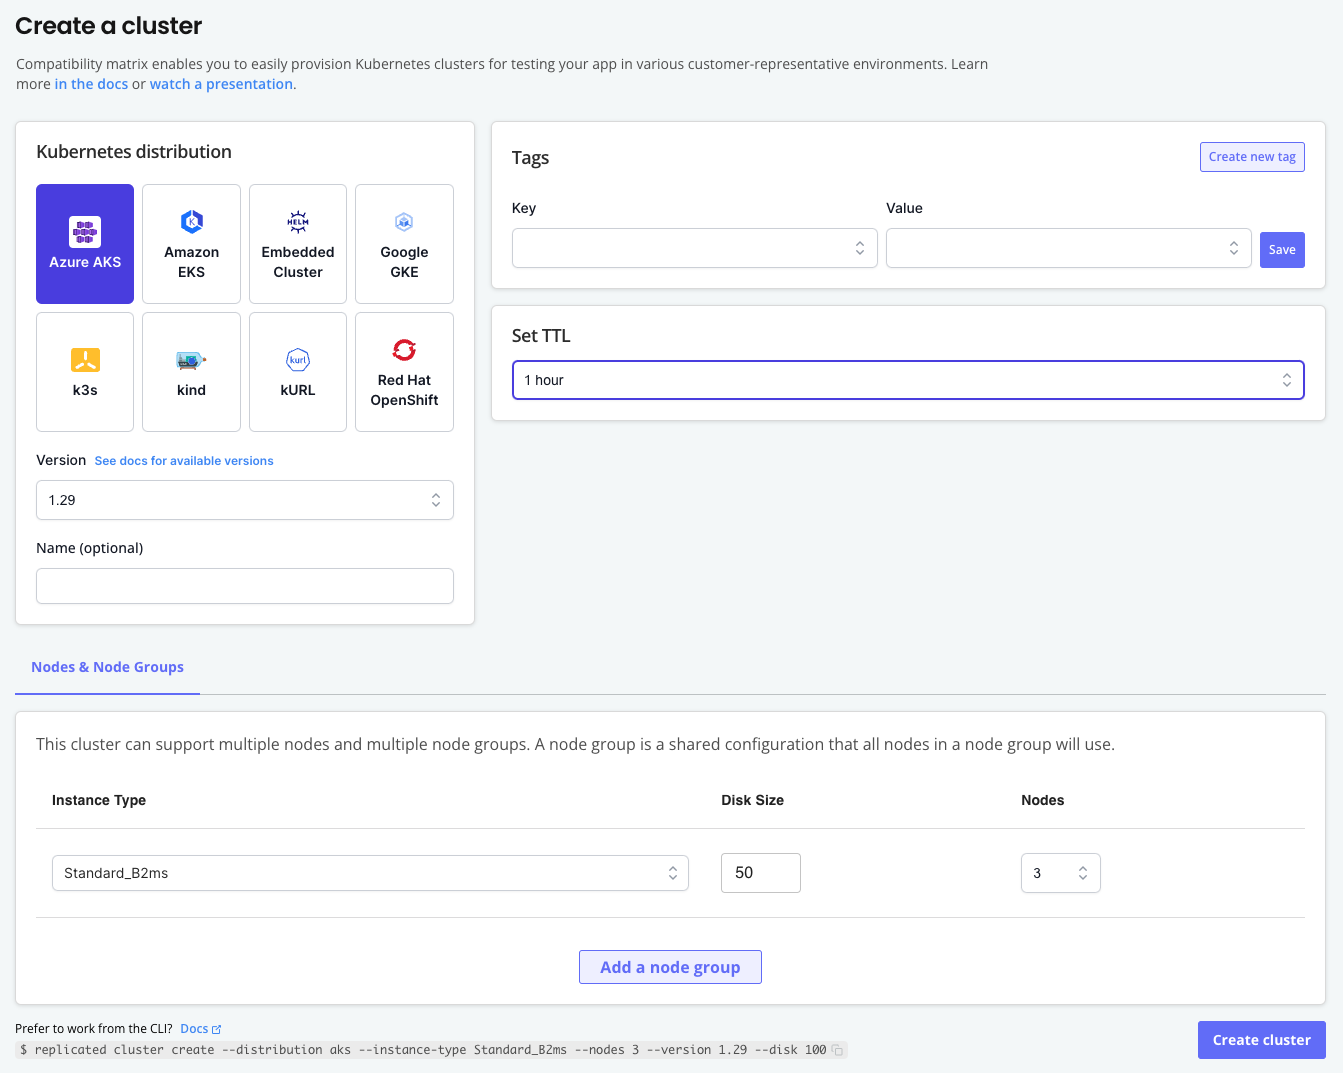
On the Create a cluster page, choose the Kubernetes distribution and version.
-
(Optional) Add a name for the cluster, add tags, and adjust the Time to Live (TTL).
-
(Optional) For Nodes & Nodes Groups, add and configure additional nodes and node groups for the cluster.
The following is an example of the Create a cluster page:
-
-
Create VM:
-
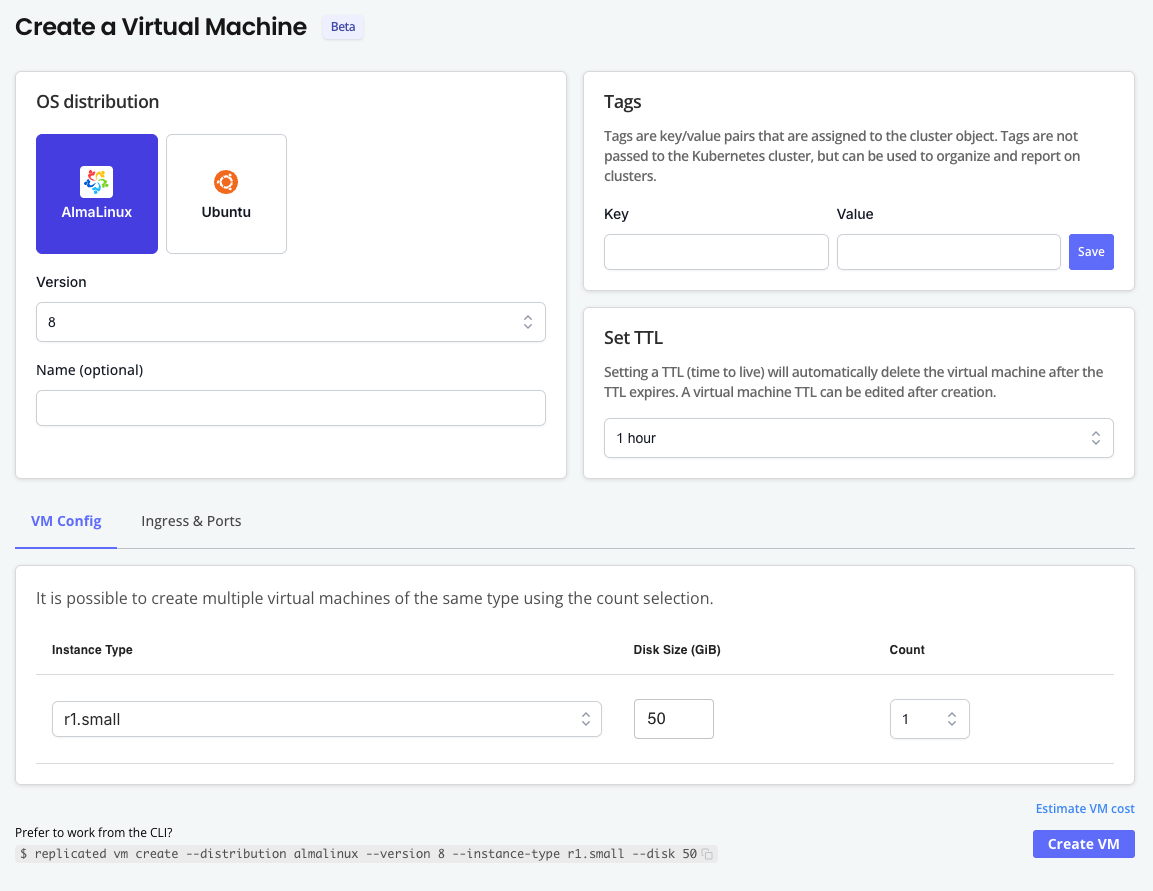
On the Create a Virtual Machine page, choose the OS distribution and version.
-
(Optional) Add a name for the VM, add tags, and adjust the Time to Live (TTL).
-
(Optional) For VM Config, choose the instance type and disk size. You can also create multiple VMs of the same type by increasing the Count.
noteYou can create TLS certs and DNS records in the Ingress & Ports tab after the VM has been created. See Expose Ports.
The following is an example of the Create a Virtual Machine page:
-
-
-
Click Create cluster or Create VM.
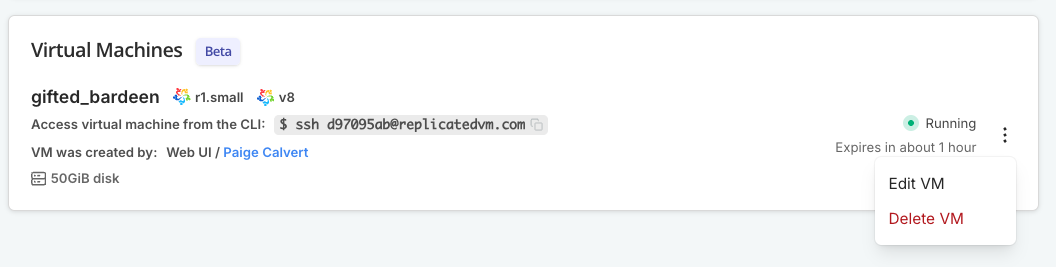
The environment is displayed in the list on the Compatibility Matrix Overview page with a status of Assigned. When the environment is ready, the status is changed to Running.
Create air-gapped environments
Using the airgap network policy to simulate an air-gapped environment is supported only for VMs and VM-based clusters. Clusters that use cloud-based distributions do not support the airgap network policy.
VMs and VM-based clusters created with CMX can use one of the following network policies:
| Network Policy | Description |
|---|---|
open | No restrictions on network traffic. |
airgap | Restrict all network traffic. |
By default, all VMs and VM-based clusters are created with an open network policy. You can change the network policy to airgap to block outbound network requests. This is useful for simulating an air-gapped environment with no outbound internet access so that you can test how your application performs.
Network policies are configured at the network level and apply to all VMs and environments connected to the network.
You can also use CMX to generate reports that track and summarize network activity on CMX networks. For more information, see Collect and View Network Reports.
VM-based cluster
To create an air-gapped cluster:
-
Create a cluster:
replicated cluster create --distribution VM_BASED_DISTRIBUTIONWhere
VM_BASED_DISTRIBUTIONis the target VM-based cluster distribution. For a list of supported distributions, see VM Clusters. -
Watch until the cluster status is
running:replicated cluster ls --watch -
Access the cluster in a shell:
replicated cluster shell CLUSTER_IDWhere
CLUSTER_IDis the ID of the cluster that you created from the output of thecluster lscommand. -
Change the network policy to
airgap:replicated network update NETWORK_ID --policy airgapWhere
NETWORK_IDis the ID of the network from the output of thecluster lscommand. -
Verify that the cluster's policy is
airgapand the status isrunning:replicated cluster lsID NAME STATUS CREATED EXPIRES POLICY HAS REPORTbdeb3515 gifted_antonelli running 2025-01-28 18:45 PST 2025-01-28 19:45 PST airgap off -
(Optional) Enable network reporting to track network activity. See Collect and View Network Reports.
VM
To create an air-gapped VM:
-
Create a VM:
replicated vm create --distribution ubuntu -
Wait until the VM status is running:
replicated vm ls -
SSH onto the VM:
Where
VM_IDis the ID of the VM from the output of thevm lscommand.For more information and additional options, see Connect to CMX VMs (SSH and File Transfer).
-
Set the network policy to
airgap:replicated network update NETWORK_ID --policy airgapWhere
NETWORK_IDis the ID of the network from the output of thevm lscommand.Example:
replicated network update 85eb50a8 --policy airgapID NAME STATUS CREATED EXPIRES POLICY HAS REPORT85eb50a8 silly_rosalind updating 2025-01-28 16:16 PST 2025-01-28 17:18 PST airgap off -
(Optional) Enable network reporting to track network activity. See Collect and View Network Reports.
Access environments
After a CMX cluster or VM is running, you can access the environment using the replicated cluster shell or ssh command that is available in the Compatibility Matrix UI.
-
To access a cluster with kubectl:
replicated cluster shell CLUSTER_IDWhere
CLUSTER_IDis the ID of the running cluster. -
To SSH into a VM:
-
If you have not done so already, set up SSH access using a public/private key pair. See Prerequisite: Set Up SSH in Connect to VMs (SSH and File Transfer).
-
Run the following command:
Where
VMIDis the ID of the running VM. -
Respond to the prompts to add the fingerprint for
replicatedvm.comand enter the passphrase for your SSH key.
-
Create environments on the same network
You can create VMs and clusters with CMX that use the same network.
Connect a VM with a cluster on the same network
You can make a CMX cluster available on the same network as a CMX VM.
Supported cluster distributions
Openshift, K3s, RKE2, EC, kURL, kind
Requirement
Replicated CLI 0.90.0 or later
To connect a VM with a cluster on the same network:
-
Create a cluster:
replicated cluster create --distribution K8S_DISTRIBUTIONFor example,
replicated cluster create --distribution k3s. -
In the output of the
cluster createcommand, underNETWORK, copy the network ID.Example:
ID NAME DISTRIBUTION VERSION STATUS NETWORK CREATED EXPIRES COST6b14376c ecstatic_raman k3s 1.33.2 queued accbd6a7 2025-08-04 13:20 PDT - $0.60In the example above, the network ID is
accbd6a7. -
Create a VM on the same network:
replicated vm create --distribution DISTRIBUTION --network NETWORK_IDWhere
NETWORK_IDis the network ID that you copied in the previous step.For example,
replicated vm create --distribution ubuntu --network accbd6a7.Example output:
ID NAME DISTRIBUTION VERSION STATUS NETWORK CREATED EXPIRES COST760a30b1 suspicious_poitras ubuntu 24.04 assigned accbd6a7 2025-08-04 13:24 PDT - $0.60
Create VMs on the same network
Use the --count flag to create multiple VMs with the same name, all running on the same Network ID.
replicated vm create --distribution ubuntu --count 3
Join VMs to an existing network
To join one or more new VMs to the network of an existing VM:
-
Run one of the following commands to get the ID of an existing VM network:
-
List VMs:
replicated vm ls -
List networks:
replicated network ls
-
-
In the output of the command, copy the network ID.
-
Use the
--networkflag to create a new VM on the same network:replicated vm create --distribution ubuntu --network NETWORK_IDWhere
NETWORK_IDis the network ID that you copied in the previous step.
Create a cluster and install a release with cluster prepare
The cluster prepare command reduces the number of steps required to provision a cluster and then deploy a release to the cluster. This is useful in continuous integration (CI) workflows that run multiple times a day. For an example workflow that uses the cluster prepare command, see Recommended CI/CD Workflows.
The cluster prepare command does the following:
- Creates a cluster
- Creates a release for your application based on either a Helm chart archive or a directory containing the application YAML files
- Creates a temporary customer of type
testnoteTest customers created by the
cluster preparecommand are not saved in your Vendor Portal team. - Installs the release in the cluster using either the Helm CLI or Replicated KOTS
The cluster prepare command requires either a Helm chart archive or a directory containing the application YAML files to be installed:
-
Install a Helm chart with the Helm CLI:
replicated cluster prepare \--distribution K8S_DISTRO \--version K8S_VERSION \--chart HELM_CHART_TGZThe following example creates a kind cluster and installs a Helm chart in the cluster using the
nginx-chart-0.0.14.tgzchart archive:replicated cluster prepare \--distribution kind \--version 1.27.0 \--chart nginx-chart-0.0.14.tgz \--set key1=val1,key2=val2 \--set-string s1=val1,s2=val2 \--set-json j1='{"key1":"val1","key2":"val2"}' \--set-literal l1=val1,l2=val2 \--values values.yaml -
Install with KOTS from a YAML directory:
replicated cluster prepare \--distribution K8S_DISTRO \--version K8S_VERSION \--yaml-dir PATH_TO_YAML_DIRThe following example creates a k3s cluster and installs an application in the cluster using the manifest files in a local directory named
config-validation:replicated cluster prepare \--distribution k3s \--version 1.26 \--namespace config-validation \--shared-password password \--app-ready-timeout 10m \--yaml-dir config-validation \--config-values-file conifg-values.yaml \--entitlements "num_of_queues=5"
For command usage, including additional options, see cluster prepare.
Edit environments
You can make changes to an environment after creating it. For example, you could extent to TTL or add DNS records to expose ports on a VM.
To edit environments:
-
In the Vendor Portal, go to Compatibility Matrix.
-
In the vertical dots menu for the target environment, click Edit [VM/cluster].
-
Make changes to the environment as needed.
Delete environments
For information about deleting environments using the Replicated CLI, see replicated cluster rm and replicated vm rm
To delete a cluster using the Vendor Portal:
-
In the Vendor Portal, go to Compatibility Matrix.
-
In the vertical dots menu for the target environment, click Delete [VM/cluster].
-
In the dialog, click Delete [VM/cluster] again to confirm.